Vector Pixel Art in Adobe Illustrator Tutorial: How to Create It, Export It and Fix SVG Gaps
Stop struggling with blurry edges and white gaps in your vector pixel art. Our latest guide covers the fast Object Mosaic method in Illustrator and includes a free tool to fix SVG rendering bugs. Create crisp, scalable, and professional pixel-perfect icons for your next web project in seconds.
Pixel art has a very specific charm. It feels intentional, graphic, nostalgic, and surprisingly modern when used well in SaaS product design, websites, indie games, and premium icon sets. But if you have ever tried making pixel art in Adobe Illustrator, you already know there is one big catch: creating it is one thing, but exporting it cleanly for the web is an entirely different beast.
You can build something that looks absolutely perfect inside Illustrator, hit export, open that SVG in a browser, and suddenly your masterpiece is ruined. You see blurry edges, faint white grid lines, or strange little gaps bleeding between the solid blocks of color. It is incredibly frustrating, especially when you know the artwork itself is mathematically perfect.
This guide walks through everything you need to know about vector pixel art. We will cover two practical Illustrator workflows for creating it (including a lightning-fast method for turning your existing vectors into retro pixel art), show you exactly how to export SVGs properly, and finally, give you a custom tool to permanently fix the rendering gaps that plague web browsers.
Why Use Illustrator for Pixel Art?
Pixel art is almost always associated with raster tools, and for good reason. Dedicated apps like Aseprite or even Adobe Photoshop are fantastic for painting out a character pixel by pixel. But Illustrator has some massive, undeniable advantages when your goal is to build reusable design assets, consistent UI icon sets, or scalable illustration systems for your brand.
- Infinite Scalability: You can resize your artwork freely—from a 16px favicon to a 4,000px billboard—while keeping the hard pixel structure perfectly intact and crisp.
- System Consistency: Illustrator makes it drastically easier to manage repeated shapes, global color swatches, and multiple artboards across a massive collection of assets.
- Library Building: If you are creating commercial assets for a design system or a marketplace (like we do at GetIllustrations), keeping everything fully editable in a vector format is a huge competitive advantage for your buyers.
The secret to success here is understanding that creating pixel art in Illustrator is less about “drawing normally” and more about strictly controlling your structure, your grid, and your export behavior.
Method 1: The Quick Way (Convert Existing Vectors into Pixel Art)
If you already have a beautiful, flat vector illustration and want to give it that 8-bit, retro style quickly, this is the absolute fastest workflow. It is based on a brilliant technique that forces Illustrator to calculate a mosaic grid for you, and it works surprisingly well for simple shapes and bold, high-contrast illustrations.
(If you want to follow along, grab any flat vector from the GetIllustrations library).
Step 1: Set Up Your File Properly
Before we touch any tools, you need to organize your file so the cleanup phase doesn't become a nightmare.
- The Background: Create a solid, dark background color on your bottom layer and lock it. This high-contrast backdrop is crucial because it helps you spot leftover light pixels around the edges later.
- The Reference: Keep one copy of the original vector graphic on the left side of your artboard on a locked layer just for visual reference.
- The Working Copy: Place the vector graphic you are actually going to convert on its own unlocked layer.
Step 2: Rasterize the Artwork
The feature we are going to use "Object Mosaic" only works on raster images. So, the first step is to temporarily convert your crisp vector into a flat image.
With your artwork selected, go to the top menu and click Object > Rasterize.
Use these exact settings:
- Color Mode: RGB (to keep your colors nice and bright).
- Resolution: High (300 ppi).
- Anti-aliasing: None.
Do not skip that last setting. Turning anti-aliasing to "None" is the most important step in the whole process. If you leave it on, Illustrator will try to smooth the edges by creating dozens of soft, transition colors between your original shapes. We want sharp, hard edges.
Note: It will look like nothing has changed on your screen, but if you check your layers panel, your vector is now an embedded raster image.
Step 3: Convert the Raster into a Pixel Grid
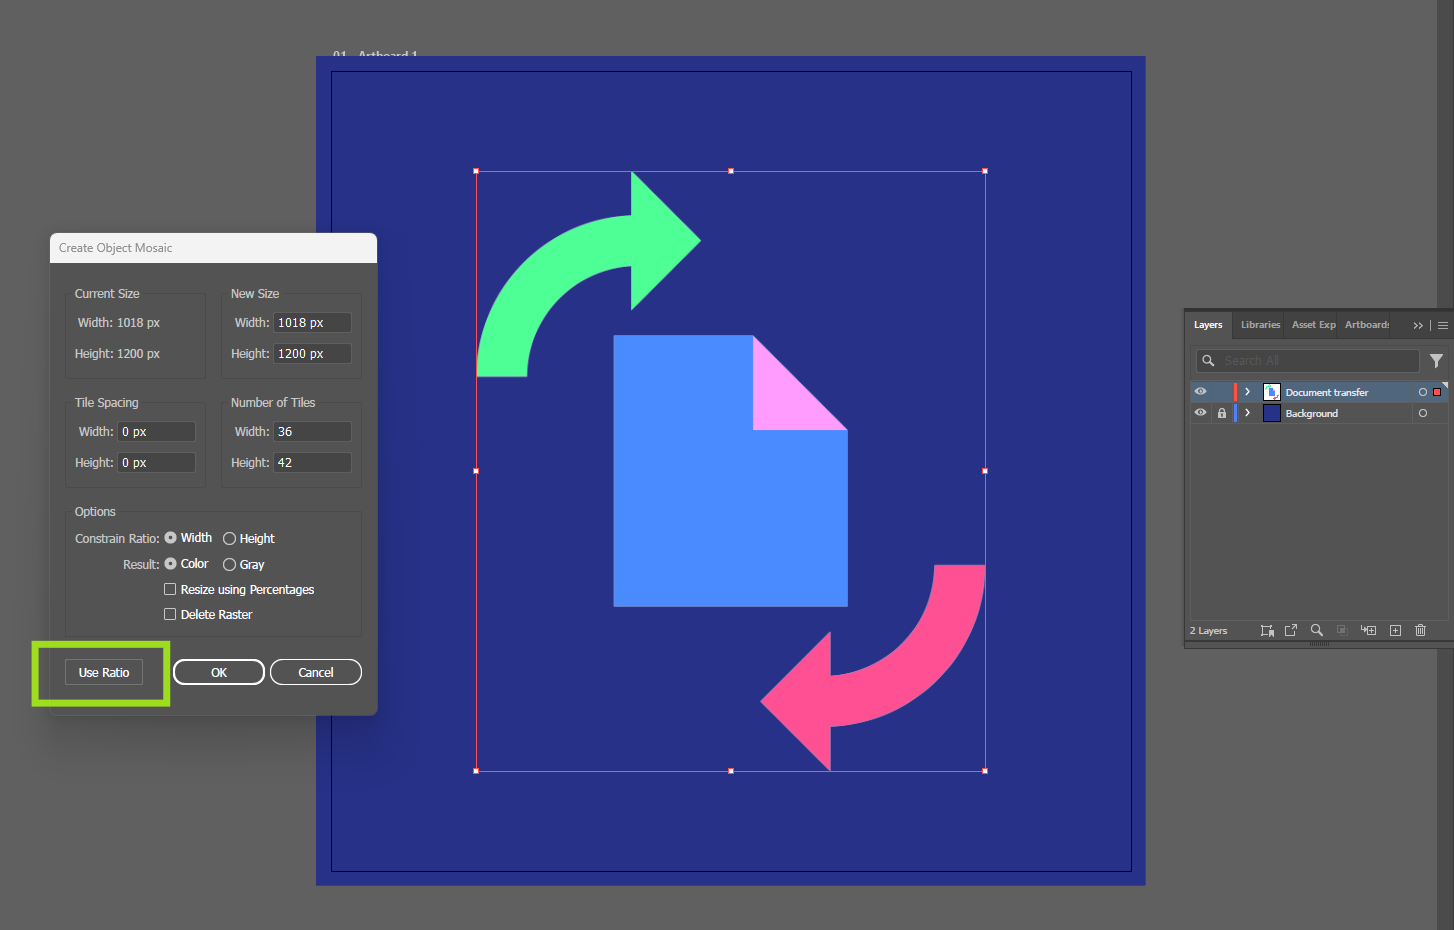
Keep your newly rasterized image selected, and go to Object > Create Object Mosaic.
This is where the heavy lifting happens. Illustrator is going to replace that flat image with a massive grid of colored vector squares.
Pay close attention to the Number of Tiles section. This dictates your "resolution" (how detailed or blocky the final result will be).
- Type a number into the Width field (for example, 36 pixels).
- If you change the dimensions manually, always click the Use Ratio button. This forces Illustrator to auto-calculate the correct Height so your artwork stays perfectly proportional. Click OK.
Step 4: Delete the Raster and Ungroup
After Illustrator generates the mosaic, those squares will be grouped together by default. But there is a catch: the original flat image is still hiding underneath them.
- Open your layers panel quickly.
- Find the embedded raster image layer and hit delete.
- Now, select the group of vector squares, go back to the Object menu, and click Ungroup.
Every single square is now an individually movable, editable vector path.
Step 5: Clean Up with the Magic Wandy
Right now, your graphic is sitting inside a big, blocky white background. It's time to carve out the silhouette.
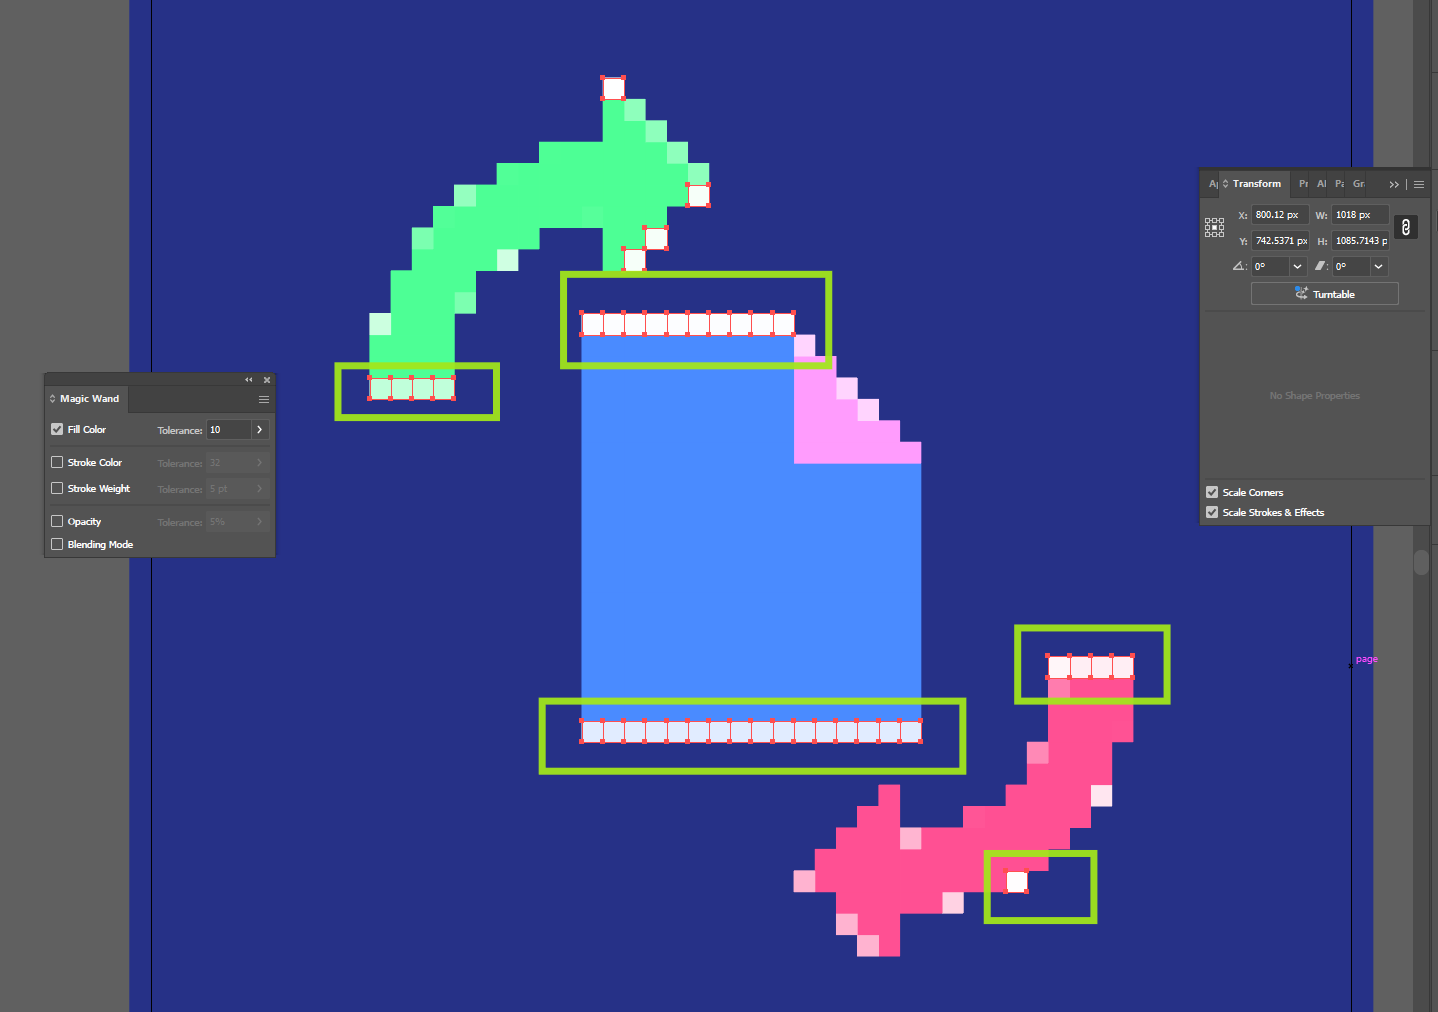
Hit Y on your keyboard to grab the Magic Wand Tool. Double-click the Magic Wand icon in your toolbar to open its settings window, and adjust the Tolerance all the way down to 0.
Click anywhere on the white background pixels and hit delete. Because we set up that dark background in Step 1, it will be incredibly easy to spot any stray white edge fragments. Hold down Shift to select multiple stray color groups at once and delete them until you are happy with the clean silhouette.
(Pro tip: If the cleanup is going too slow, bump the Magic Wand tolerance up to 3.)
Step 6: Simplify and Refine the Colors
Object Mosaic isn't perfect; it often creates small, unwanted color variations that muddy the design. True pixel art relies on a very restricted, intentional color palette.
Use your Magic Wand (with a low tolerance) to select those slightly-off pixels. Then, hit I on your keyboard to bring up the Eyedropper Tool and sample your main, intended color. Alternate between the Magic Wand and the Eyedropper until your graphic is reduced to just three or four bold, distinct colors.
Step 7: Fix Small Gaps Manually
Sometimes the automated cleanup leaves an empty square or an awkward, jagged edge. Don't stress—it is a two-second fix.
Hit V to grab your Selection Tool, click a colored pixel right next to the empty hole, hold Alt (or Option on Mac), and drag it over to duplicate it and fill the gap. Make sure View > Snap to Point is turned on in your settings so the square drops perfectly into the grid.
When to Use This Method
This workflow is an absolute lifesaver when you already have a flat vector illustration and want to create a pixel-art variation quickly. It is ideal for rapid experiments, themed seasonal assets, retro-styled landing pages, and fast conversions. It isn't always mathematically perfect, but it is definitely the fastest way to get the job done.
Method 2: The Precision Way (Build Pixel Art from Scratch)
If you want the cleanest possible result—especially if you are designing UI assets, app icons, or polished illustration packs for sale—building your pixel art manually is still the gold standard.
This method takes longer, but it gives you absolute, uncompromising control over the shape, silhouette, color placement, and grid consistency.
Set Up a Real Grid
Start by forcing Illustrator to behave more like a dedicated pixel editor.
- Turn on View > Show Grid.
- Turn on View > Snap to Grid so your shapes lock into place perfectly.
- Go into your Preferences and set up a predictable grid line system (e.g., Gridline every 10px, Subdivisions 1) so every block you draw stays identical.
Build Using Repeated Squares
Instead of drawing paths freely with the pen tool, you need to think of your artwork as a structure built out of LEGO bricks. Create one perfect vector square and use it as your base unit. Duplicate it across rows and columns (using the Alt/Option drag method), and build your illustration gradually.
This approach gives you highly intentional control over every single "pixel." More importantly, it usually produces much cleaner code when you export later, because the underlying vector math is simpler and more deliberate from the start.
Use Live Paint for Faster Filling
If building block-by-block feels too tedious, there is a great middle ground. Create a massive grid of empty squares (like graph paper) over your artboard. Then, select the grid, grab the Live Paint Bucket, and start clicking cells to fill them with color.
This workflow feels very similar to painting in a raster editor like Photoshop, but you still walk away with a scalable, editable vector result.
The Biggest Problem with Pixel Art SVGs
Now for the part that usually drives designers crazy.
You can follow every single rule. You can do everything right inside Illustrator, ensure your grid is perfect, export your pixel art as an SVG, open it in Chrome or Safari, and... you still see thin white lines or faint, transparent cuts between the colored shapes.
You didn't do anything wrong. That problem is rarely caused by bad artwork. It comes from the way modern web browsers render adjacent vector shapes. Even when two vector squares sit perfectly edge-to-edge mathematically, the browser’s rendering engine will often anti-alias (smooth) the edges of each square independently. When it does this, it creates a microscopic, sub-pixel gap between them, resulting in a tiny, visible seam.
This is exactly why a pixel-art SVG can look flawless inside Illustrator but slightly broken in a live browser preview.
How to Export Pixel Art SVGs from Illustrator
Before we deploy the heavy machinery to fix the browser issue, you need to make sure you are using the cleanest possible export settings out of Illustrator.
When you go to File > Export For Screens > SVG, use these settings for the most predictable results:
- Styling: Presentation Attributes (This keeps the code cleaner than using inline CSS).
- Decimal Precision: 1 or 2 (You don't need 5 decimal points for perfect squares).
- Responsive: Off (Unchecking this forces Illustrator to output absolute width and height tags, which helps stabilize the layout).
- Minify: Off (Leave this off if you want to be able to easily read and inspect the SVG code later).
These settings help keep your SVG file structure simple and predictable. They will not magically cure the browser rendering seams on their own, but they prevent Illustrator from adding unnecessary complexity to the code.
Our Free Tool: Safe SVG Fix + Resize for Pixel Art
After testing multiple developer approaches to solve the "browser seam" issue—including aggressive grid snapping, coordinate rebuilding, and complex path merging—the safest, most reliable solution turned out to be much simpler.
Instead of trying to move the pixels around and risk breaking the illustration, our custom tool preserves your original layout and simply adds a microscopic overlap to the bounding box of each square. That tiny, invisible overlap completely hides the browser seam without distorting your artwork or inflating the file size.
Because we know how frustrating this is, we built a script to do it automatically.
What the Tool Does
- Resizes SVGs: It scales your art to a standard maximum dimension (like 2000px) so it looks crisp on high-res displays.
- Preserves the Grid: It keeps your original pixel layout and vector math perfectly intact.
- Kills the Seams: It adds a tiny overlap (a "bleed") between adjacent squares to eliminate those annoying browser rendering lines.
- Batch Processing: It works on full folders of SVGs at once, not just one file at a time.
- Safe Output: It creates a brand-new output folder automatically, so it never overwrites your original files.
Why This Version Works Better
During our testing, the most problematic, glitchy results came from scripts that tried to “fix” the SVG grid by aggressively snapping coordinates together. That sounds logical in theory, but in complex files, it often introduced massive horizontal cuts or shifted entire rows out of alignment.
The safer, professional approach is not to rebuild the artwork's structure after export. The better approach is to preserve the artist's original work and only adjust how the shapes overlap at render time. That is exactly what this Python script does.
How to Use It
- Download the ZIP file containing the script.
- Extract it to your desktop.
- Keep the Python file (
safe_fix_and_resize_svg.py) and the.BATfile in the exact same folder. - Simply drag your folder containing your exported SVGs and drop it directly onto the
.BATfile.
The script will run instantly and create a new folder containing your fixed, resized, and seam-free SVG files, totally ready for web production.
(Advanced Option: If you are comfortable with the command line, you can tweak the overlap manually. A slightly larger overlap can help if a particular browser is being stubborn. Just run: python safe_fix_and_resize_svg.py "your-folder" --overlap 0.5)Best Practices for Real-World Use
If you want your pixel art to look incredible both as a downloadable asset in a marketplace and as a crisp preview on a live website, here is the exact production workflow I recommend:
- Create the artwork in Illustrator using either the quick mosaic conversion method or the manual block-building method.
- Export clean SVGs from Illustrator using the simplified settings mentioned above.
- Run those exported SVGs through our fixer script to eliminate the browser seams.
- Display PNG previews on your storefronts, portfolios, or landing pages whenever possible (PNGs are rasterized and will literally never show vector seams).
- Deliver the fixed SVG as the final, editable source format for your clients or buyers to download.
That combination guarantees the absolute best balance of quality, flexibility, and bulletproof browser reliability.
Check Pixel Art Vector illustrations made using the methods explained in this tutorial
Vector Pixel Art Collection
Nostalgic 8-bit vibe to your designs with our new collection of fully scalable pixel art vectors. Featuring quirky robots and retro e-commerce graphics, these illustrations give you that classic arcade look in a crisp, infinitely resizable format.
Final Thoughts
Vector pixel art is one of those design disciplines that looks incredibly simple right up until you actually try to ship it to production. The creative side is fun, but the technical execution matters just as much.
The good news is that once you understand these two creation workflows and respect the limitations of how browsers render SVGs—the whole process becomes highly predictable. You can build fast when you are ideating, refine by hand when top-tier quality matters, and still walk away with lightweight, web-friendly vector assets that hold up flawlessly in the real world.