
How to Make Pixel Art from a Photo: Grid, Colors, Dithering and Export
Turn a photo into crisp pixel art for free. Pick the right grid size, color count and dither mode, then export a sharp PNG, SVG, GIF or sprite sheet.

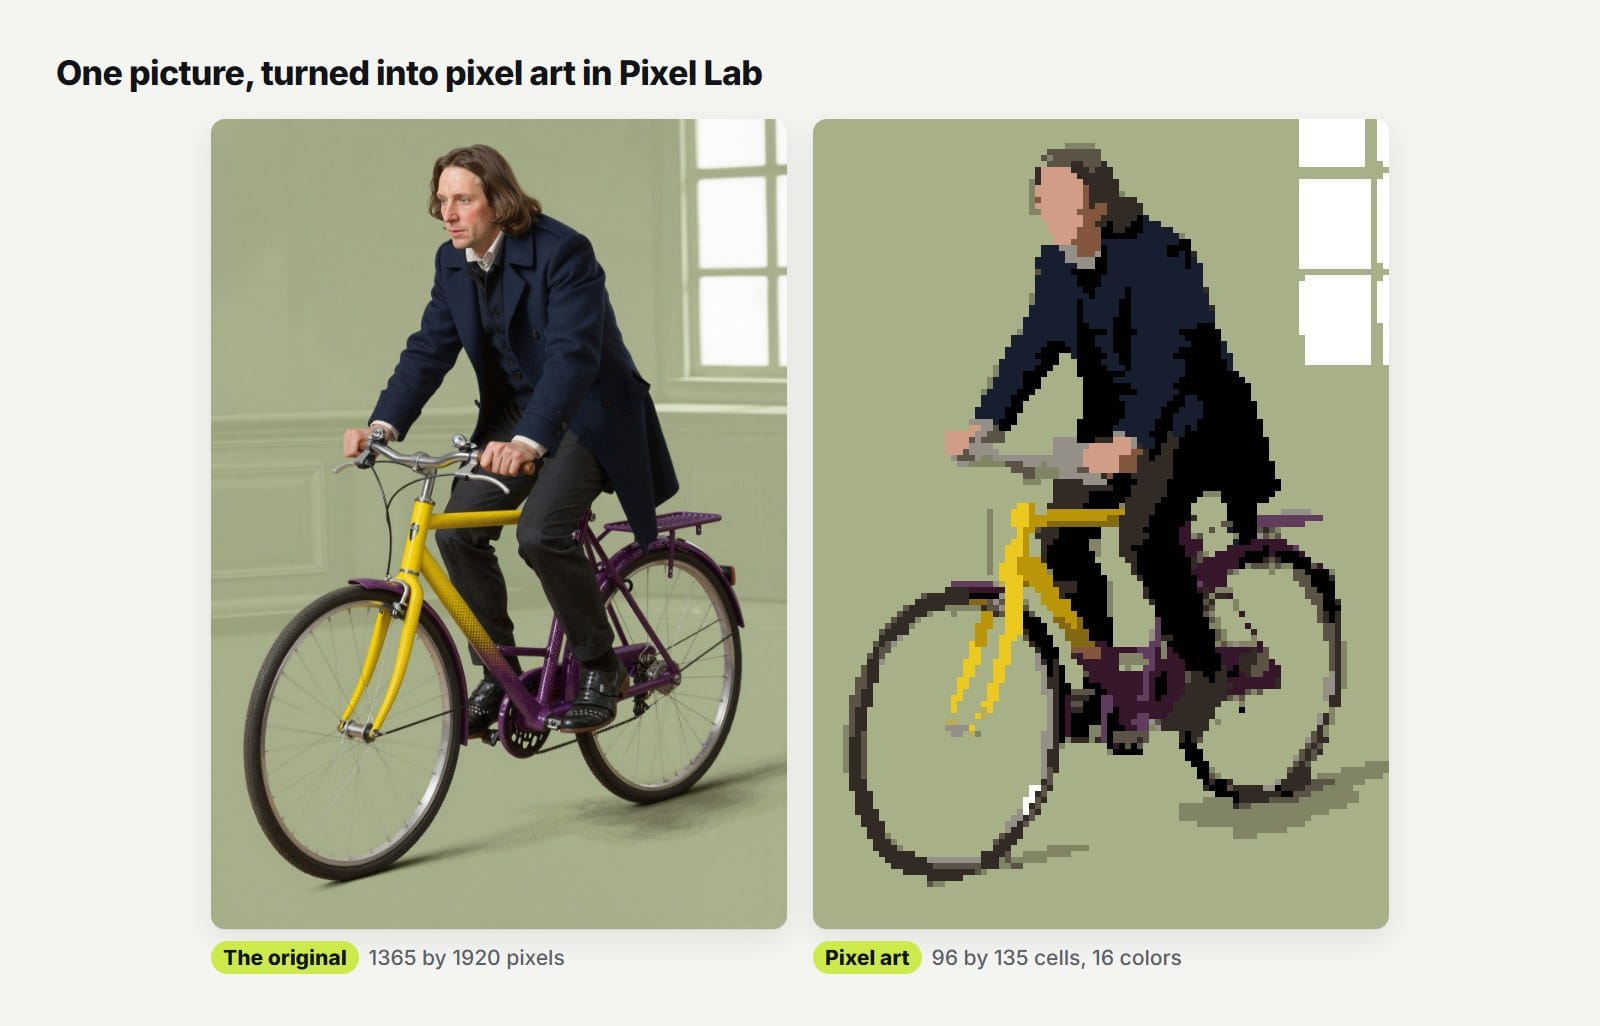
Most photo to pixel art converters give you a size slider, a palette menu and a download button, and the popular ones we checked don't mention dithering at all. You get something blocky, but rarely something that looks like pixel art someone meant to make. The difference is in about five decisions the converter usually makes for you: how big the grid is, how many colors you keep, whether you dither, how much you clean up and how you export.
This guide shows how to make pixel art from a photo one decision at a time, with a real example for each. Everything here was made in Pixel Lab by GetIllustrations, our free pixel art converter, but the advice works in any tool.
How do you turn a photo into pixel art?
- Pick a photo with one clear subject and strong contrast.
- Shrink it to a small grid, such as 64 cells wide.
- Cut it down to somewhere between 4 and 16 colors.
- Choose a dither mode, or none for a flat look.
- Clean up the stray single pixels.
- Export a PNG at a whole number scale, or an SVG.
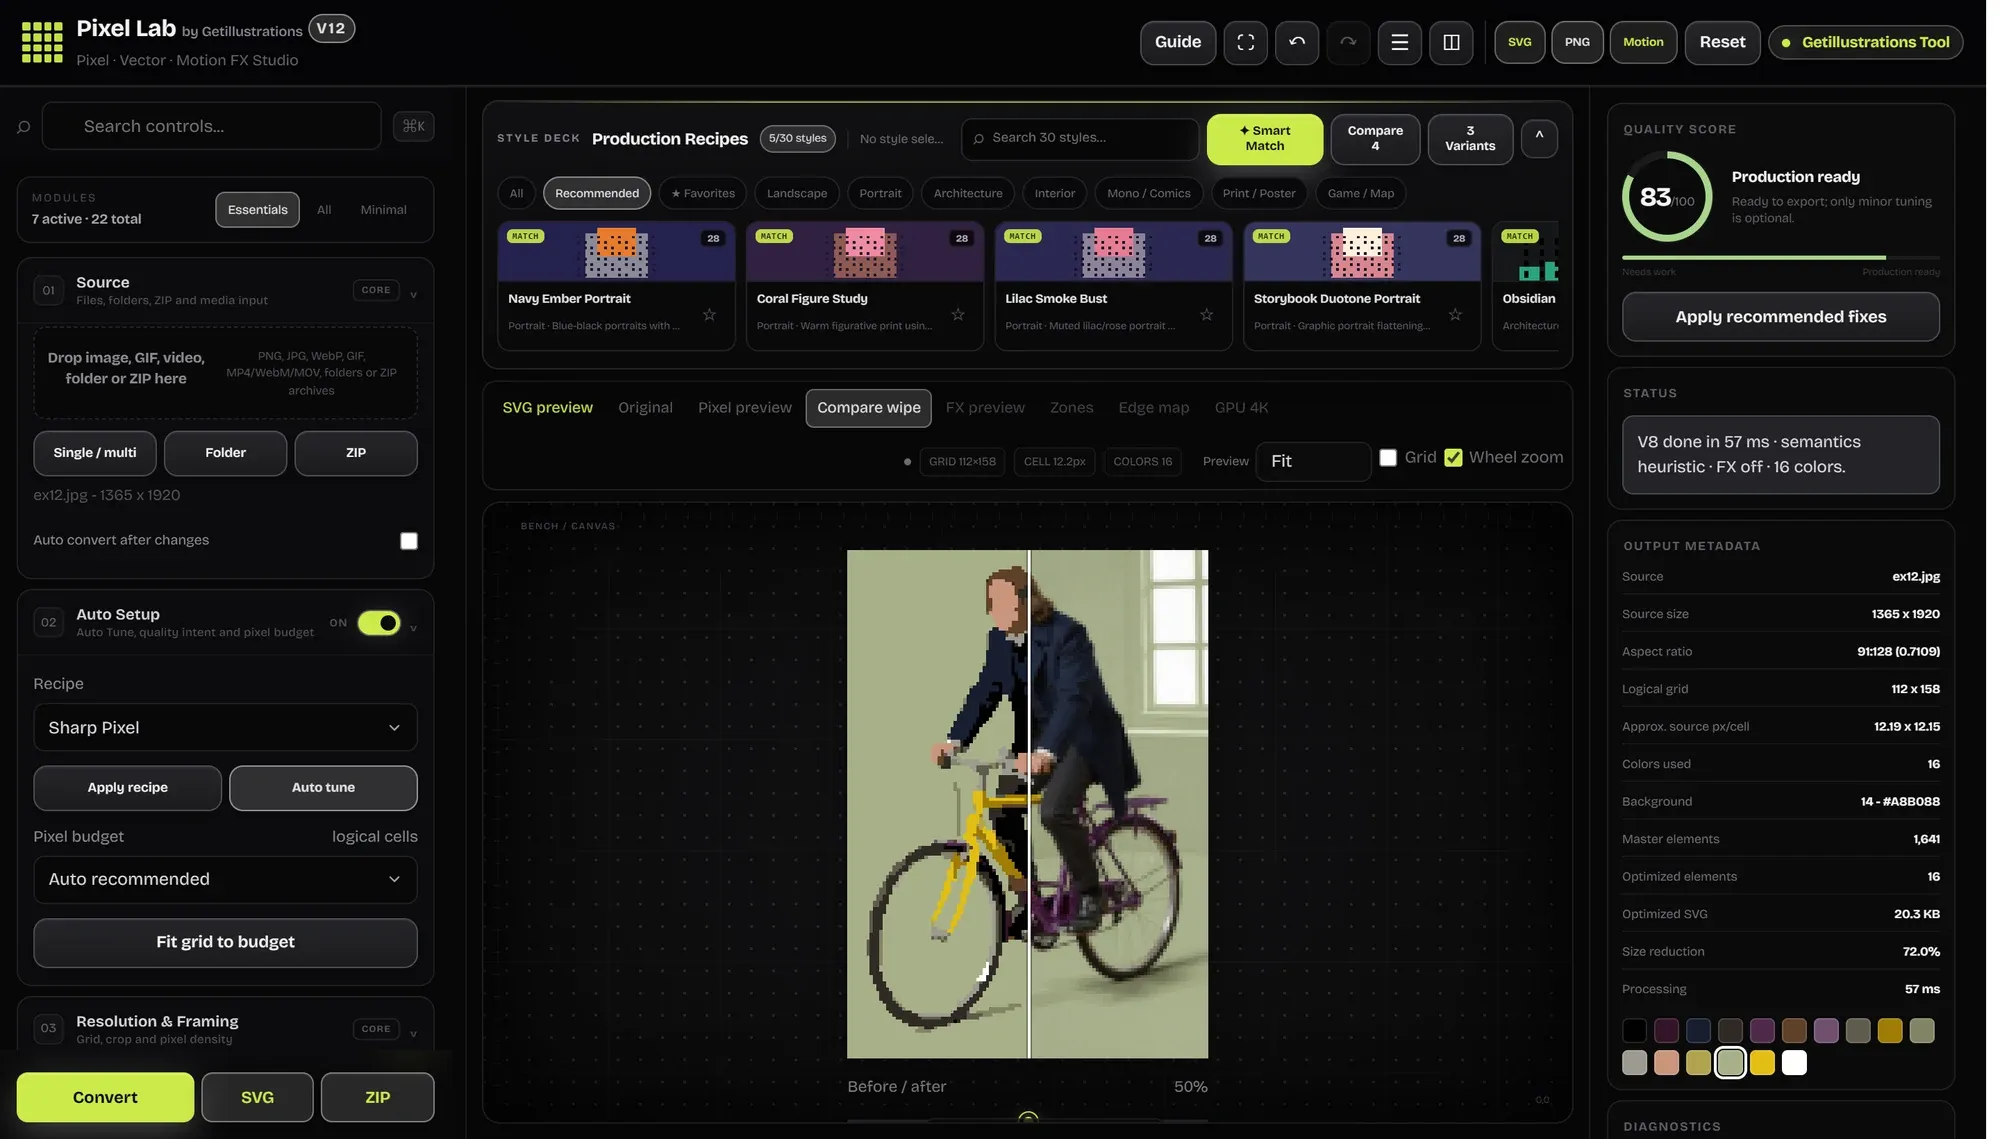
In Pixel Lab, steps 2 to 5 live in four modules on the left: Resolution and framing, Color system, Dither and Cleanup. Cleanup is hidden in the default Essentials view, so press All at the top of the module list to see it.
Which photos make good pixel art?
Most photo to pixel art tips come down to picking the right photo. The best ones have one subject, a plain background, even light and a strong shape.
Our cyclist on a flat green wall is close to ideal: you can read the outline even when the whole picture is only 32 cells wide. A busy street scene at the same size turns to mush.
Crop tight before you convert. In Resolution and framing, Fit mode is on Cover by default, which crops the edges to fill the grid, and Source zoom with Focal X and Focal Y pushes the frame toward your subject. For faces, a front view in soft light works far better than a dramatic side light.
Is JPEG or PNG better? For the photo you start from, it barely matters. For the pixel art you export, always use PNG, because JPEG smears the edges of every cell.
What size should pixel art be?
Grid size is the biggest decision you'll make, because it sets how much of the photo survives. This is the same picture at three widths, all with 8 colors and no dithering.
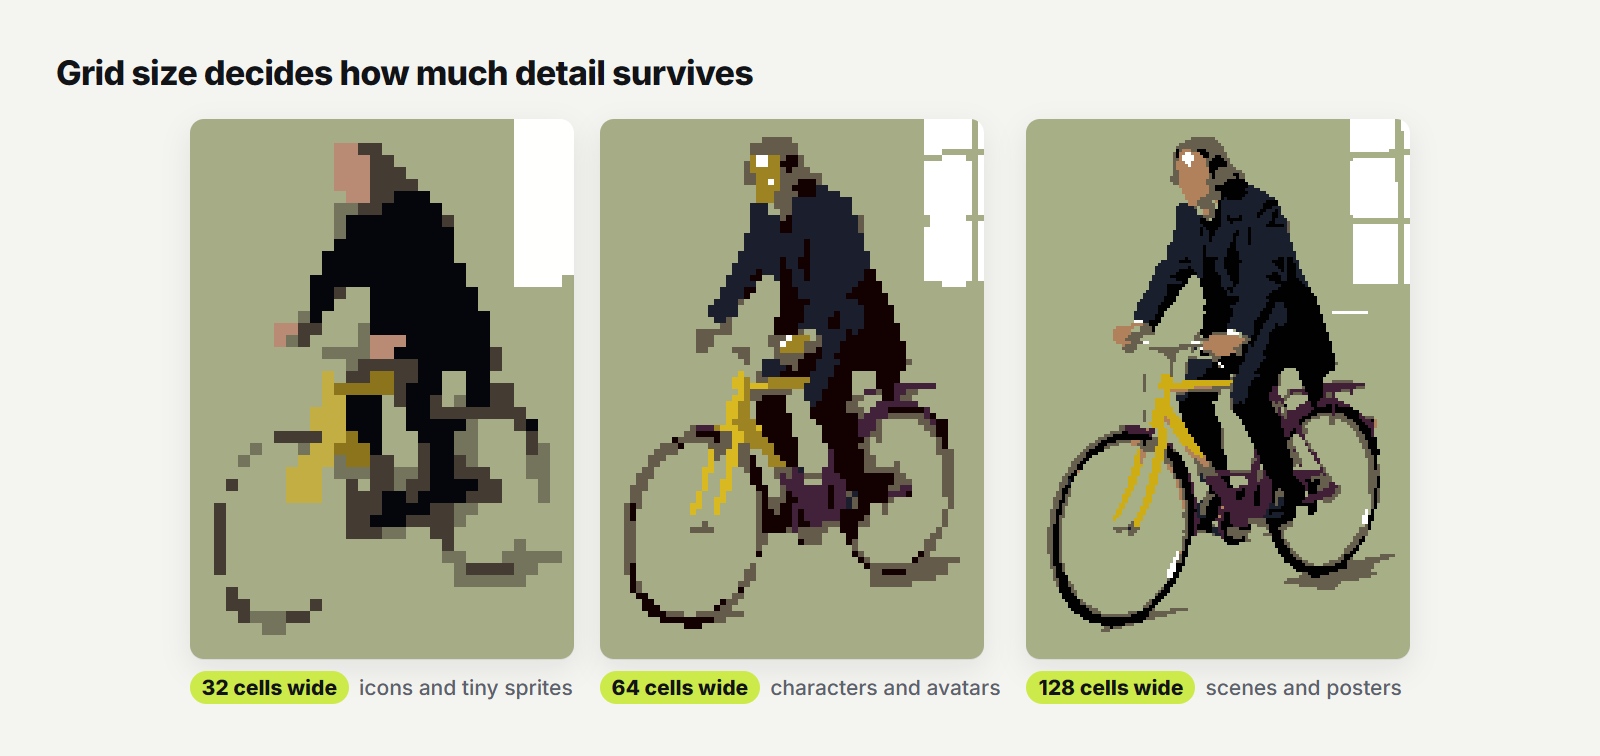
At 32 cells wide the cyclist turns into a silhouette with a yellow bike. Double the width and you can read the coat and the frame of the bike, and by 128 it looks more like a detailed illustration than a sprite.
None of them is wrong: a 32 cell cyclist makes a good icon, a 128 cell one a poster.
| Grid width | Good for |
|---|---|
| 16 to 32 cells | Icons, emoji and tiny sprites |
| 48 to 64 cells | Characters, avatars and portraits |
| 96 to 160 cells | Scenes. The original Game Boy screen was 160 by 144 pixels |
| 200 cells and up | Detailed posters and illustrations |
Set the size in Resolution and framing. Type a Grid width and leave Lock source aspect ratio on, and the height follows. Pixel Lab's automatic budget aims for detail (about 224 cells across for a square photo), so for a chunky 8 bit look, type the width yourself.
For a classic 32x32 or 16x16 sprite, turn off Lock source aspect ratio and type the same number into Grid width and Grid height. Cover then crops the photo to a square.
How many colors should pixel art have?
Fewer than you'd think. Classic sprites use 8 to 16 colors, Game Boy style art uses 4 shades, and black and white art uses exactly two. Fewer colors means a stronger, more graphic look, and more colors means a closer copy of the photo.
Watch what happens to the same 64 cell grid as the palette changes.
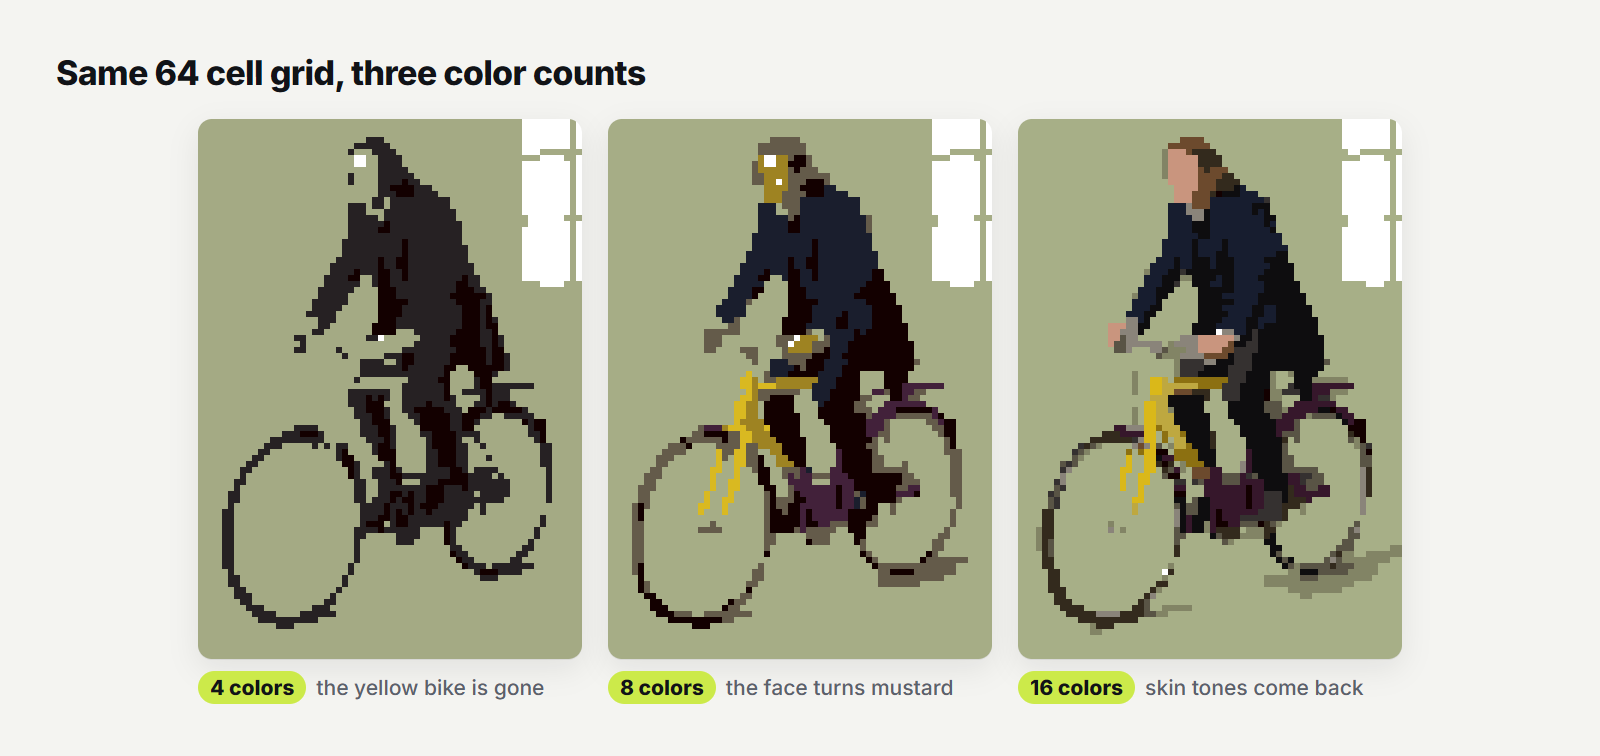
With 4 colors the yellow bike disappears completely. With 8, the face turns an odd mustard, and at 16 the skin tones come back.
The tradeoff: small palettes look more like pixel art, but they can drop a color you care about.
Use your own palette
In Color system, Palette source has three options. Auto extract from image picks colors from your photo, Style preset gives you seven preset palettes, and Custom palette lets you build your own with 2 to 24 colors.
Want a palette from Lospec, like the 16 colors of PICO 8? Type its hex codes into Custom palette.
Three settings help a small palette behave. Minimum palette separation stops two almost identical colors wasting slots, Preserve darkest and lightest tones keeps your shadows and highlights, and Lock accent seed forces one color you care about, like that yellow bike, into the palette.
What is dithering in pixel art?
Dithering in pixel art places pixels of two palette colors in a pattern so your eye blends them into a shade the palette doesn't have. It smooths gradients like skies and skin with fewer colors, at the cost of visible texture and a larger file.
Here's one portrait, cut to 4 shades of gray, through six of the 15 dither modes in Pixel Lab.
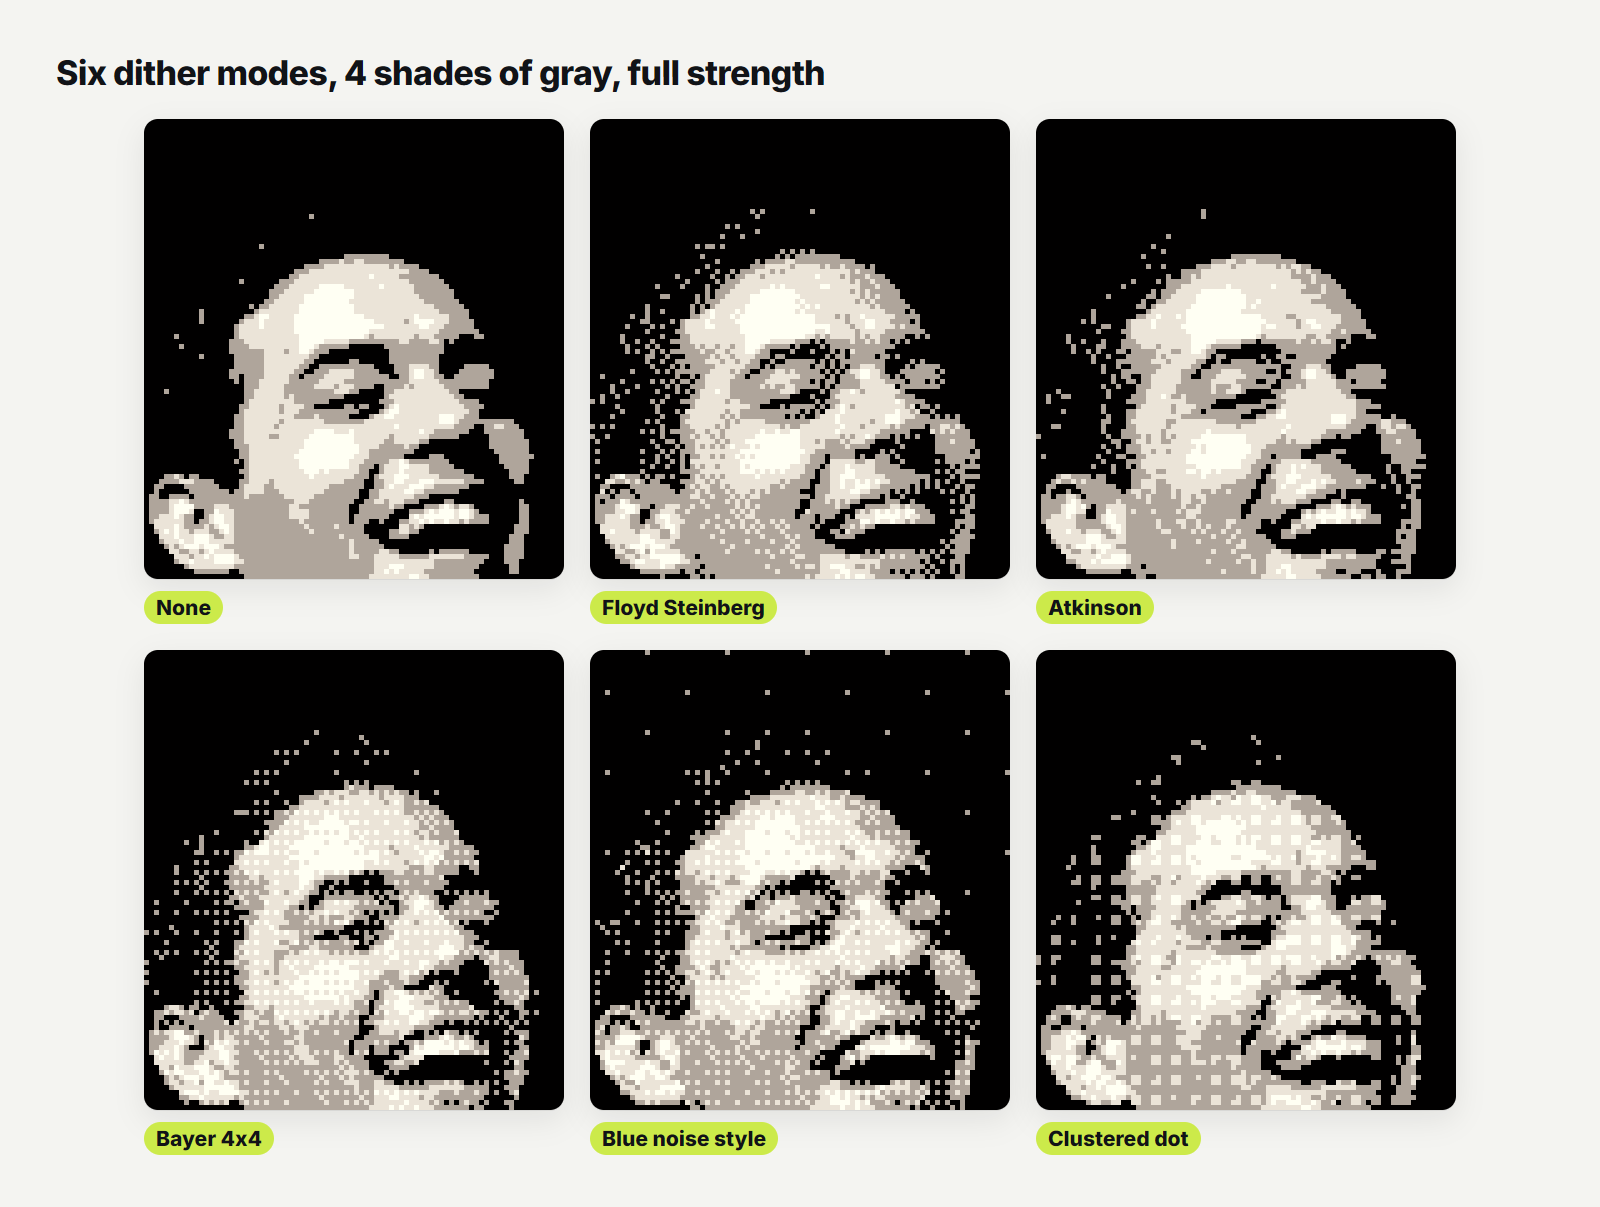
Which dither mode should you use?
- None gives flat areas and a poster look. Best for logos, icons, flat art and small sprites, and it makes the smallest SVG.
- Floyd Steinberg spreads the error into a fine, organic grain. Great on photos with smooth gradients, on grids of 100 cells or more.
- Atkinson is crisper and more contrasty. Light areas go lighter and shadows clip, which suits very small palettes and that early Mac look.
- Bayer 4x4 lays down a regular crosshatch that instantly reads as retro game art. Bayer 2x2 is tighter and Bayer 8x8 handles long, smooth gradients.
- Clustered dot groups pixels into dots like a printed newspaper. Blue noise style gives even grain with no visible grid, though it sprinkles specks into flat dark areas, as you can see above.
Stucki and Jarvis Judice Ninke are smoother and less grainy than Floyd Steinberg, Burkes and Sierra land in between, and all four are worth a try on large posters.
Floyd Steinberg vs Bayer: which looks more like pixel art?
Bayer. Its regular pattern is what most people picture when they think of old game consoles, while Floyd Steinberg looks more like a photo printed on a cheap printer. Bayer also has one practical advantage: in a GIF or video it stays put from frame to frame, while error diffusion modes like Floyd Steinberg reshuffle their grain every frame and shimmer.
How strong should dithering be?
Dither strength defaults to 25%, which is subtle. Raise it to 60% to 100% if you want the pattern to show. Pattern scale makes ordered patterns bigger and chunkier, and Serpentine diffusion (on by default) stops error diffusion from leaving streaks in one direction.
Skip dithering for flat art, tiny sprites and anything you'll export as SVG, because dithering breaks flat areas into scattered cells, and the SVG grows with every one.
How to clean up pixel art made from a photo
Converted pixel art almost always has a few stray pixels: single dark cells on a light coat, specks along an edge. Hand drawn pixel art rarely has them, which is why they give a converted image away.
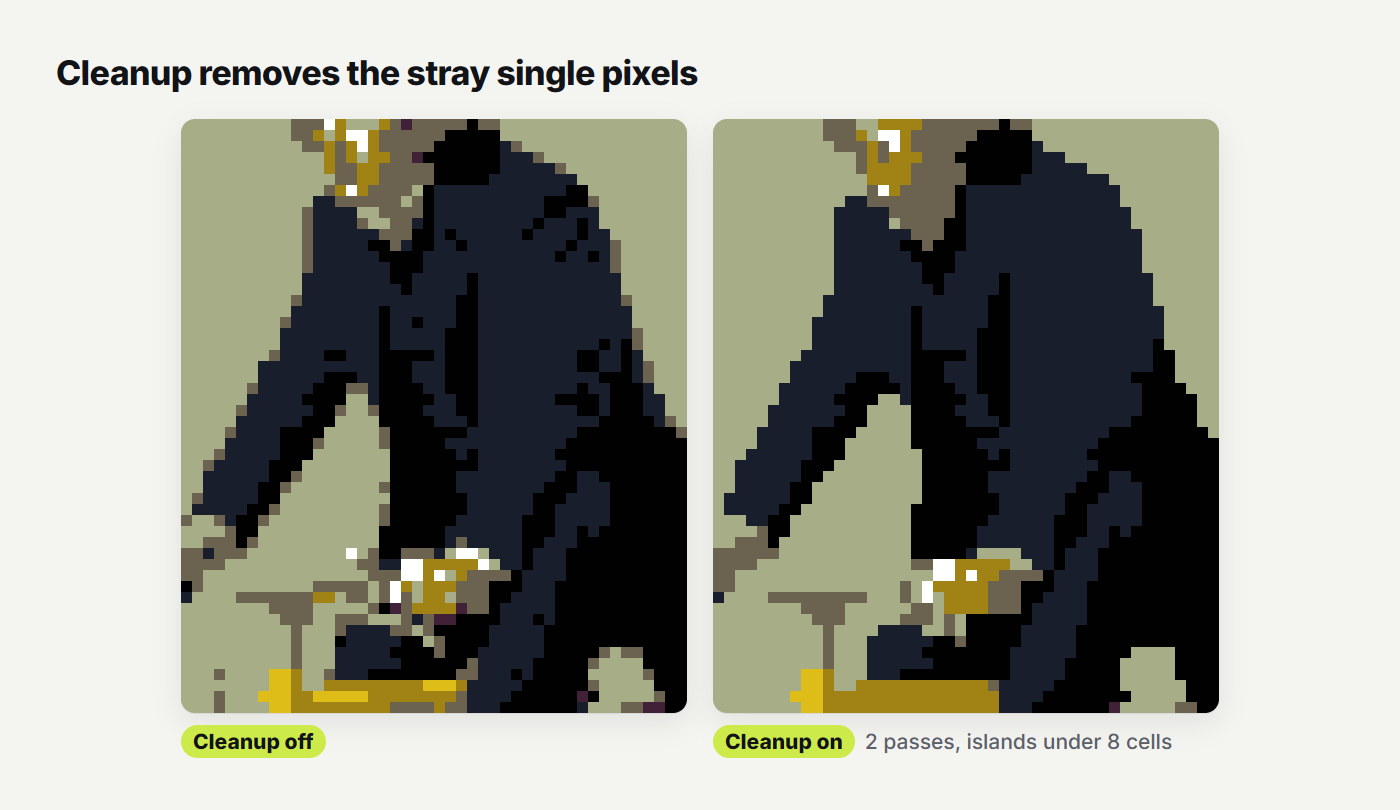
The Cleanup module handles most of it. Raise Neighbor cleanup passes, which starts at 0, to smooth isolated cells, set Remove tiny islands to delete clumps below that size, and keep Edge protection up so real details survive. If thin lines vanish, open Sampling and edges (also under All), switch Sampling to Edge aware area sample and raise Thin line recovery.
The Quality score in the right panel rates each result out of 100, and Apply recommended fixes sets the cleanup for you. Faces and hands still tend to need a few cells nudged by hand in a pixel editor, since Pixel Lab has no pencil, and that's normal.
How to export pixel art without blur
Pixel art goes blurry for one reason: something smooths it when it gets bigger. This is the same sprite, enlarged both ways.
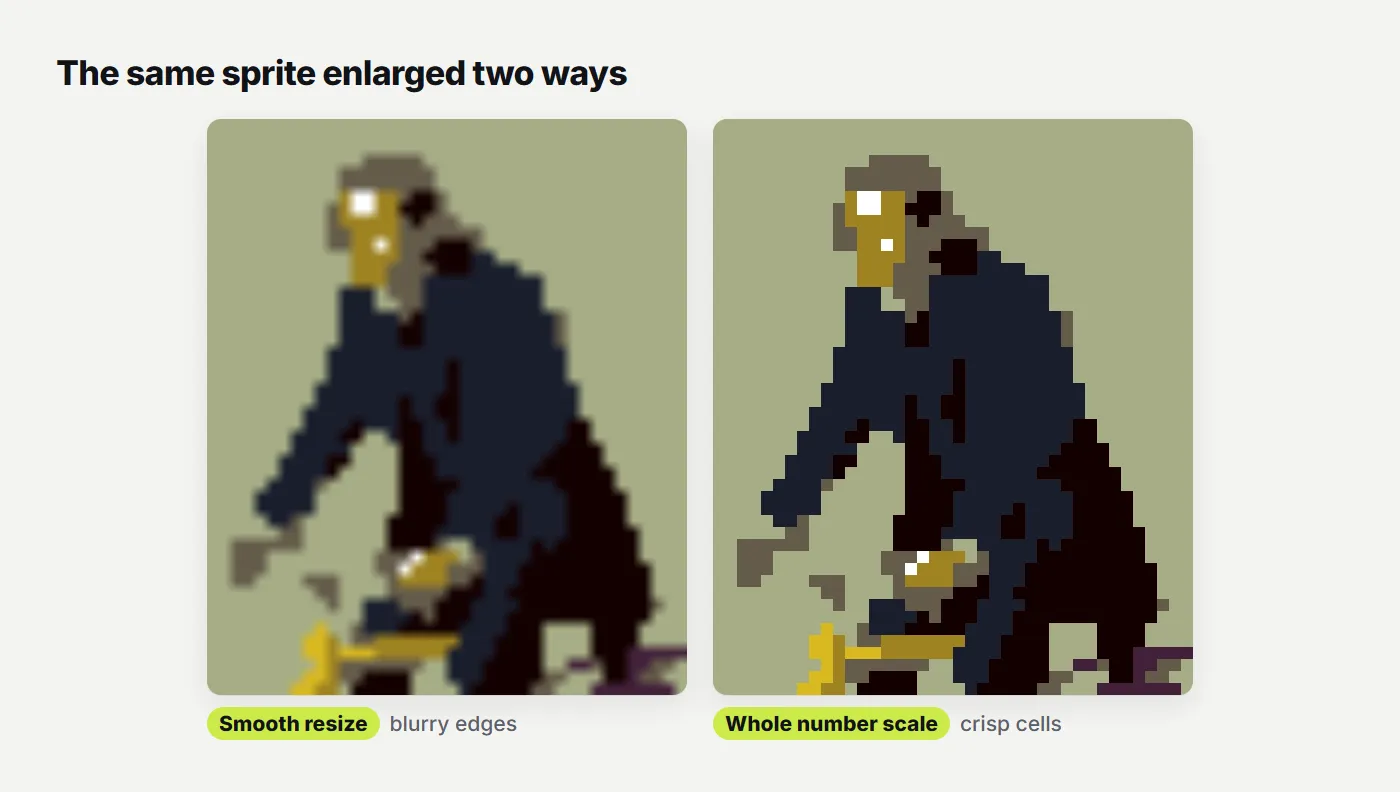
Export PNG at a whole number scale
PNG preview scale offers 1x, 2x, 4x, 8x and 16x, and every one is a whole number, so each cell stays a perfect square. Use 1x if the art is going into a game engine, where one pixel per cell is the real sprite size, and set the engine's texture filter to nearest neighbor. For the web or social media, 8x is a safe choice.
Export SVG you can edit in Figma or Illustrator
Pixel Lab also exports SVG. The Master SVG groups shapes by color, and the Optimized SVG merges them into one path per color, which is much smaller. On our cyclist the optimized file came out at 20.3 KB, 72% smaller than the master.
Export ZIP bundles both SVGs, the PNG, the palette and your settings.
Bringing the SVG into Illustrator? Our tutorial on building and fixing vector pixel art in Illustrator covers the gaps that sometimes show between cells. To change the colors afterwards, you can recolor the exported SVG for free.
Can you turn a GIF or video into pixel art?
Yes. Drop a GIF, or an MP4, WebM or MOV clip, into the Source module. Pixel Lab shows the first frame so you can tune your settings on it, then the GIF and Video module renders every frame the same way.
Press All to show the GIF and Video module, then set FPS between 8 and 30, Max duration to 3, 5 or 10 seconds or the full clip, and an output scale, then press Export GIF, Export WebM or Animated SVG. Use Bayer or Blue noise style for anything that moves, so the pattern doesn't shimmer. One thing to know: for animated GIF input, the tool itself recommends Chrome or Edge.
How to make a sprite sheet from your pixel art
Load your frames as separate images, a whole folder or a ZIP. They line up in a queue and every frame gets the same settings, which keeps a character consistent from frame to frame.
Open the Sprite sheet module (it also appears under All), set Columns, Tile size, Padding and a transparent or detected background, then press Export sprite sheet ZIP. You get a sprite sheet PNG plus a JSON file with the position and size of every frame.
Each file in the queue becomes one tile, so if your animation is a video, split it into frames first. Saved settings and the Collection style system keep a whole set of sprites on the same palette.
Converter or hand drawn: which pixel art do you need?
A converter gives you a strong first pass in seconds. On our test picture each conversion took well under a second, though bigger grids take longer. Hand drawn pixel art gives you control over every cluster of pixels, and nothing a converter makes will quite match a good pixel artist.
The best results usually come from both. Convert, then finish the important parts by hand in a pixel editor like Aseprite, or in Figma using the SVG.
As an image to pixel art converter, Pixel Lab doesn't redraw or generate anything. It samples your actual photo into a grid. If you want smooth vector shapes instead of pixels, that's what Vectorizer Lab is for, and our guide on how to convert a PNG to SVG walks through it.
Where to get pixel art illustrations for a project
If you need a consistent set of pixel characters for a product, a landing page or a game jam, converting photos one by one gets slow, and keeping them consistent is harder still.
Our pixel art illustrations collection brings four packs and 175 illustrations together in one retro style. Every piece comes as SVG and PNG with a commercial license.
For a game or an app, the 8 bit character illustrations and the robot pixel art illustrations are a quick start.
Frequently asked questions
Is Pixel Lab free?
Yes. It's free, with no account, no watermark and nothing to install, and it's open source under the MIT license. The conversion runs in your browser.
What size should pixel art from a photo be?
16 to 32 cells wide for icons and tiny sprites, 48 to 64 for characters and portraits, and 96 to 160 for scenes. Export the PNG at 1x if it's going into a game engine.
Can I use a Lospec palette or my own colors?
Yes. Set Palette source to Custom palette, then add 2 to 24 colors one at a time and type each hex code, since there's no direct import. You can save the result as a preset or export it as Palette JSON.
Should I use dithering for pixel art?
Use it on photos with gradients, like skies and skin. Skip it for flat art, tiny sprites and SVG exports. For anything animated, use Bayer instead of Floyd Steinberg.
Why does my pixel art look blurry when I resize it?
Smooth resizing blends neighboring cells, and a scale that isn't a whole number makes some cells bigger than others. Export at 2x, 4x or 8x, or use the SVG, and set nearest neighbor filtering in your app or game engine.
Does Pixel Lab use AI to redraw my photo?
No. It samples your photo into a grid and reduces the colors.
There's an optional segmentation model that can sort the picture into zones like sky and people, so you can keep dithering to one part of the image. It's off by default and downloads about 40 MB from a public CDN the first time you use it.
Make pixel art from your own photo
Find a photo with one clear subject, open Pixel Lab, set the grid to 64 cells and the colors to 8, and change one setting at a time from there. You'll learn more in ten minutes of that than from any guide.