
How to Convert PNG to SVG Without Losing Quality, Step by Step
Convert a PNG or JPG to a clean, layered SVG for free. Learn which images trace well, the exact steps, how to check quality and how to fix colors later.

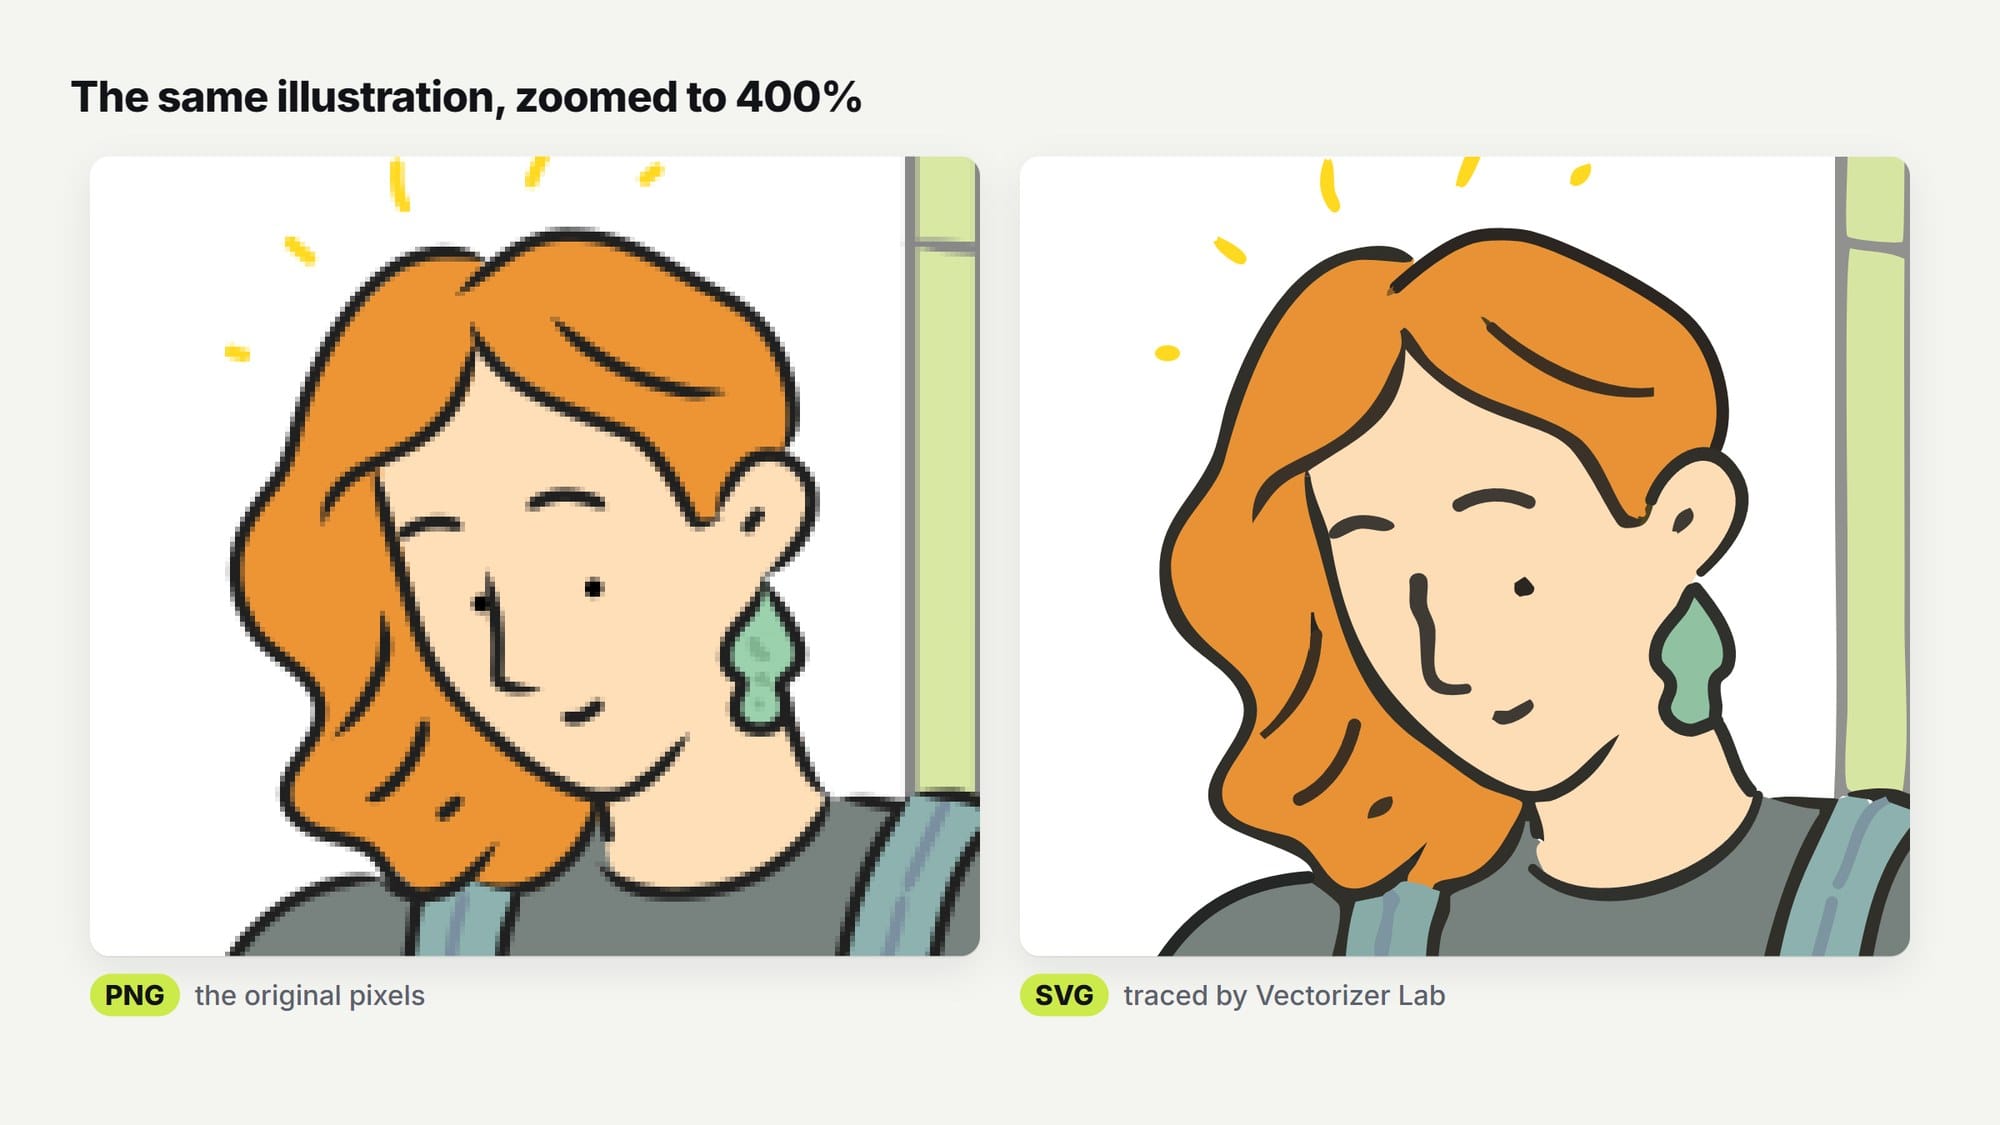
You've got a logo as a PNG, the printer wants a vector, and the first converter you try hands back an SVG that looks exactly as blurry as the PNG did. Annoying, and common, because some converters just paste your picture inside an SVG file and call it done.
You can convert a PNG to a real, sharp, editable SVG for free. Flat illustrations and logos come through almost perfectly. Photos and soft 3D renders change a lot.
Below I'll walk through it in our free PNG to SVG converter and show you a quick way to tell a real vector from a fake one. The same steps work for JPG to SVG.
The illustration at the top of this page is from our Journey pack, traced in Vectorizer Lab and zoomed to 400% so you can see what changes.
What does it mean to vectorize an image?
Vectorizing an image means redrawing its pixels as shapes: outlines, curves and fills stored as math instead of a grid of colored dots. A PNG holds a fixed number of pixels and blurs when you enlarge it. An SVG holds the shapes themselves, so it stays sharp at any size.
That's the whole reason people want it. A vector logo works on a business card and on the side of a van. You can change its colors in Figma, cut it on a Cricut or a laser, and the file is often smaller than the PNG.
Is SVG better than PNG?
For logos, icons and flat illustrations, yes. They're made of clean shapes, so the SVG is sharper, editable and usually lighter.
For photos and screenshots, no. A photo is millions of subtle color changes, and a PNG or JPG stores that far better than a pile of shapes ever will.
Can you convert a PNG to SVG without losing quality?
It depends almost entirely on what's in the picture. Here's what we see when we run real images through the tool.
Images that convert cleanly
Flat illustrations, logos, icons, line drawings and pixel art. Our flat illustration sample came back with a fidelity score of 99 out of 100: 47 shapes, a 17.5 KB file and only 0.4% of pixels visibly different from the original. If you're working with this kind of art, our flat vector illustration guide explains why it traces so well.
Images that change when you convert them
Photos, 3D renders and anything with soft shading. Smooth gradients get broken into flat bands of color, because even with gradient fill each shape gets one simple gradient at most. A robot from our Bloomie 3D balloon pack scored 79 and needed 652 shapes and 274 KB to get there.
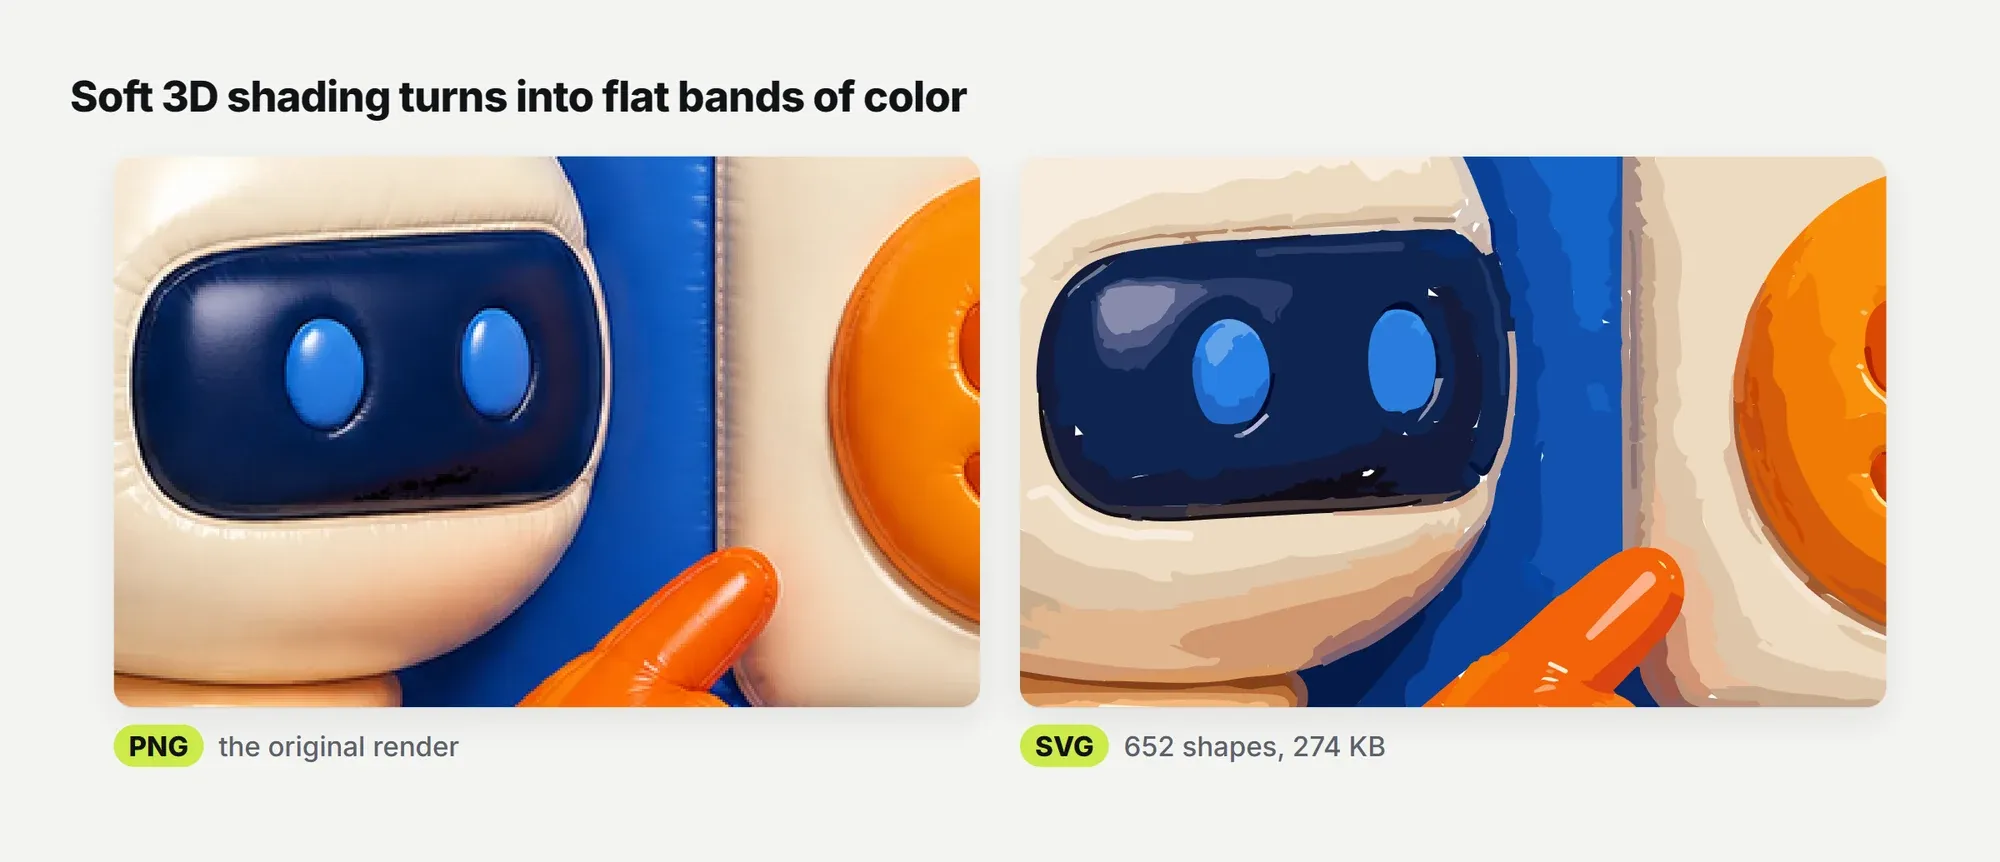
Text is the other surprise. Letters come back as outline shapes, not editable type, so if you need to change the words you'll be retyping them.
Prepare your image first
Start from the largest, cleanest copy you can find. A PNG beats a heavily compressed JPG, because those little JPEG blocks get traced as real detail. Crop to the part you need, and if you've got an iPhone photo in HEIC format, export it as a JPG first.
Got a tiny, rough image? Enlarge it 2x to 4x first, then trace the bigger version. Our guide on how to increase image resolution covers that part.
How to convert PNG to SVG for free, step by step
- Open Vectorizer Lab in your browser.
- Drop your PNG or JPG onto the page, or click Open image(s), or paste it.
- Pick a preset that matches your image, or leave the default.
- Press Auto and let it test settings for about a minute.
- Check the result in the Compare and Difference views.
- Fix colors or remove the background if you need to.
- Click Download SVG.
The steps are the same whether you call it converting a PNG to SVG or vectorizing an image. The tracing runs in your browser, so there's nothing to install and no account to make.
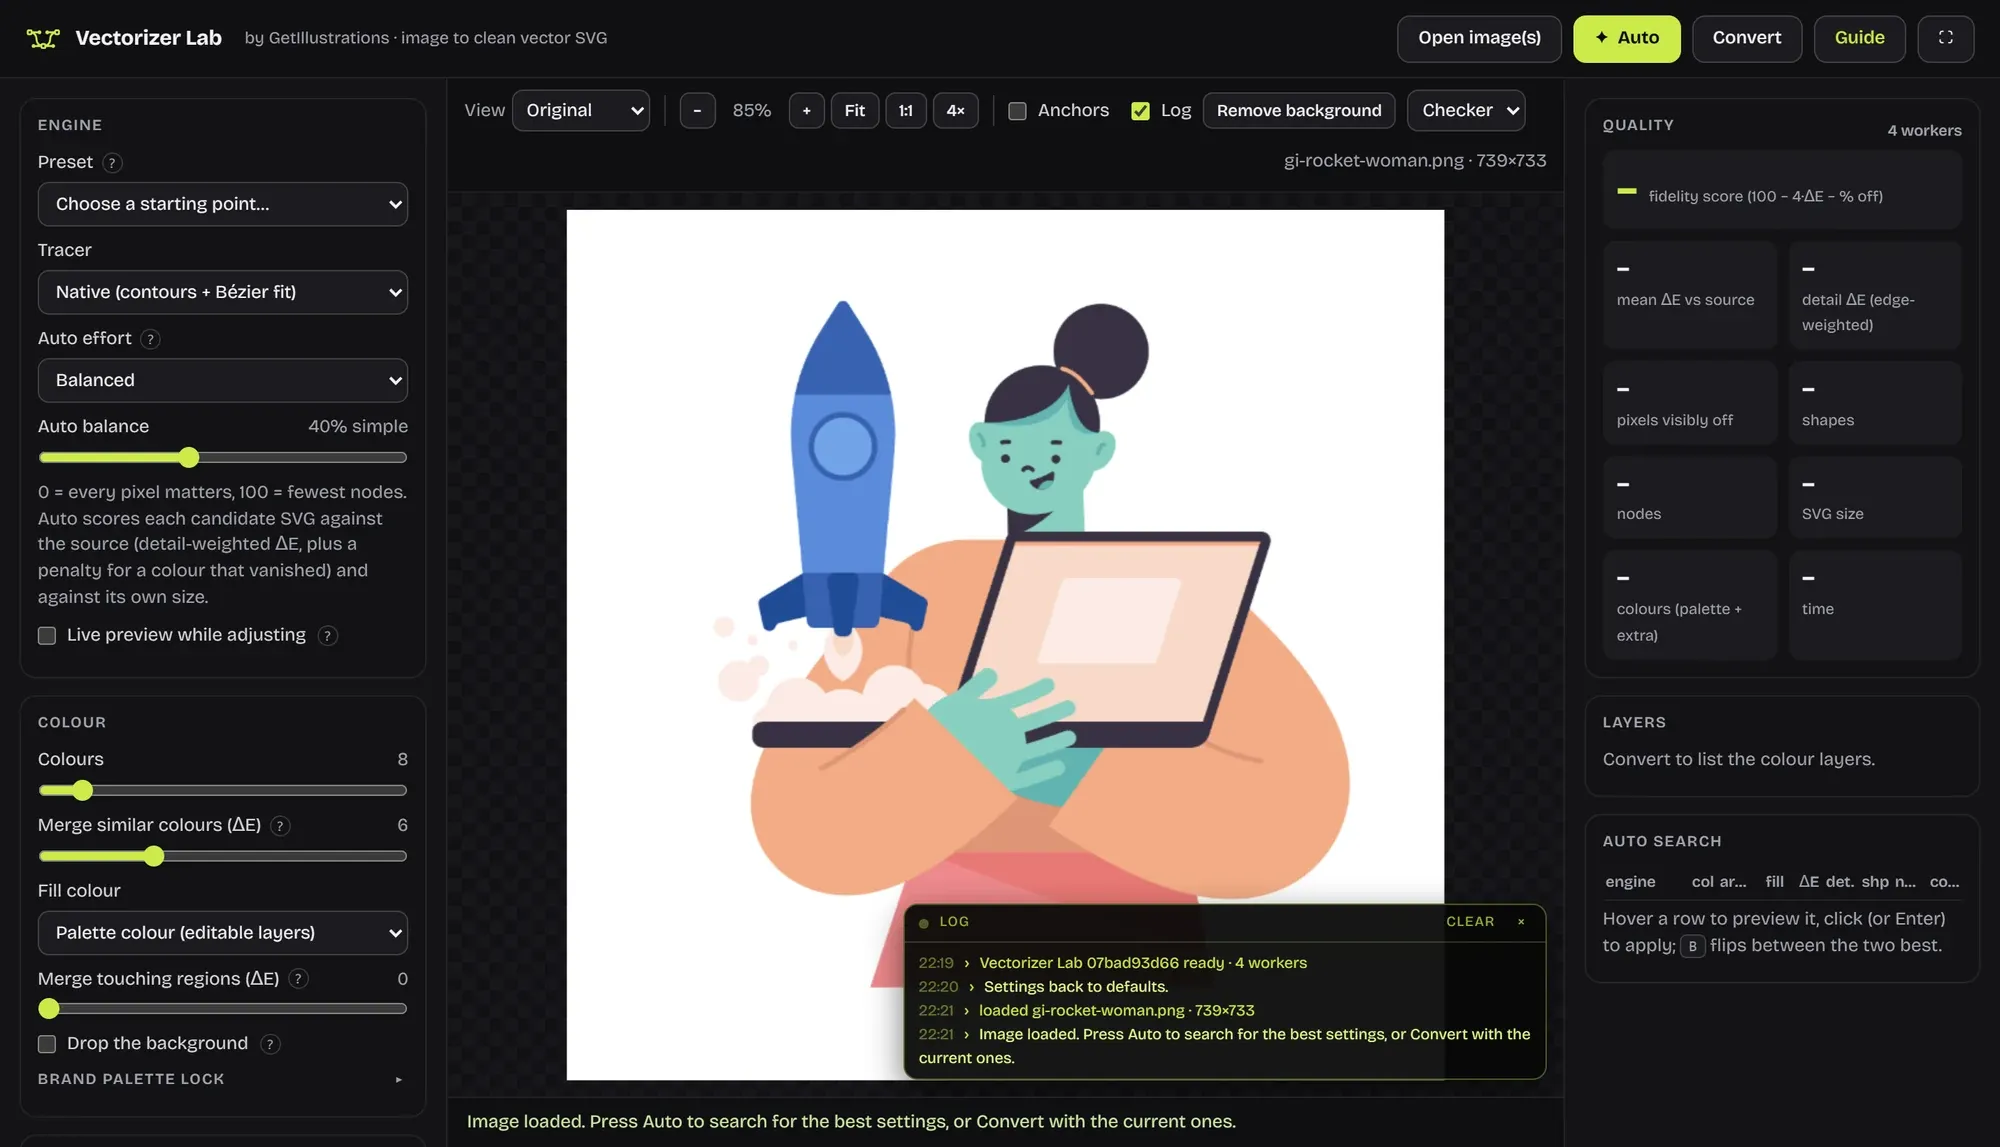
Choose a preset
The Preset menu gives you a starting point for eight kinds of image: icons and logos, flat illustrations, painterly scenes, line art and engravings, photo posters, pixel art, soft 3D renders, and halftone or stipple textures. Each one sets sensible starting values for that kind of art. If most edges in your image are soft, the status bar will suggest the 3D render preset, though it never switches by itself.
Let Auto find the settings
Auto is where most of the work happens. It tries different color counts, cleanup levels, curve smoothing and corner settings, renders every candidate back to pixels, and compares each one against your original. The best balance of accuracy and file size wins.
A progress sweep crosses the image while it works, and a log prints every choice it makes. On our machine a flat illustration took under a minute, and a big detailed scene took closer to three. Press Esc at any point and it keeps the best result found so far.
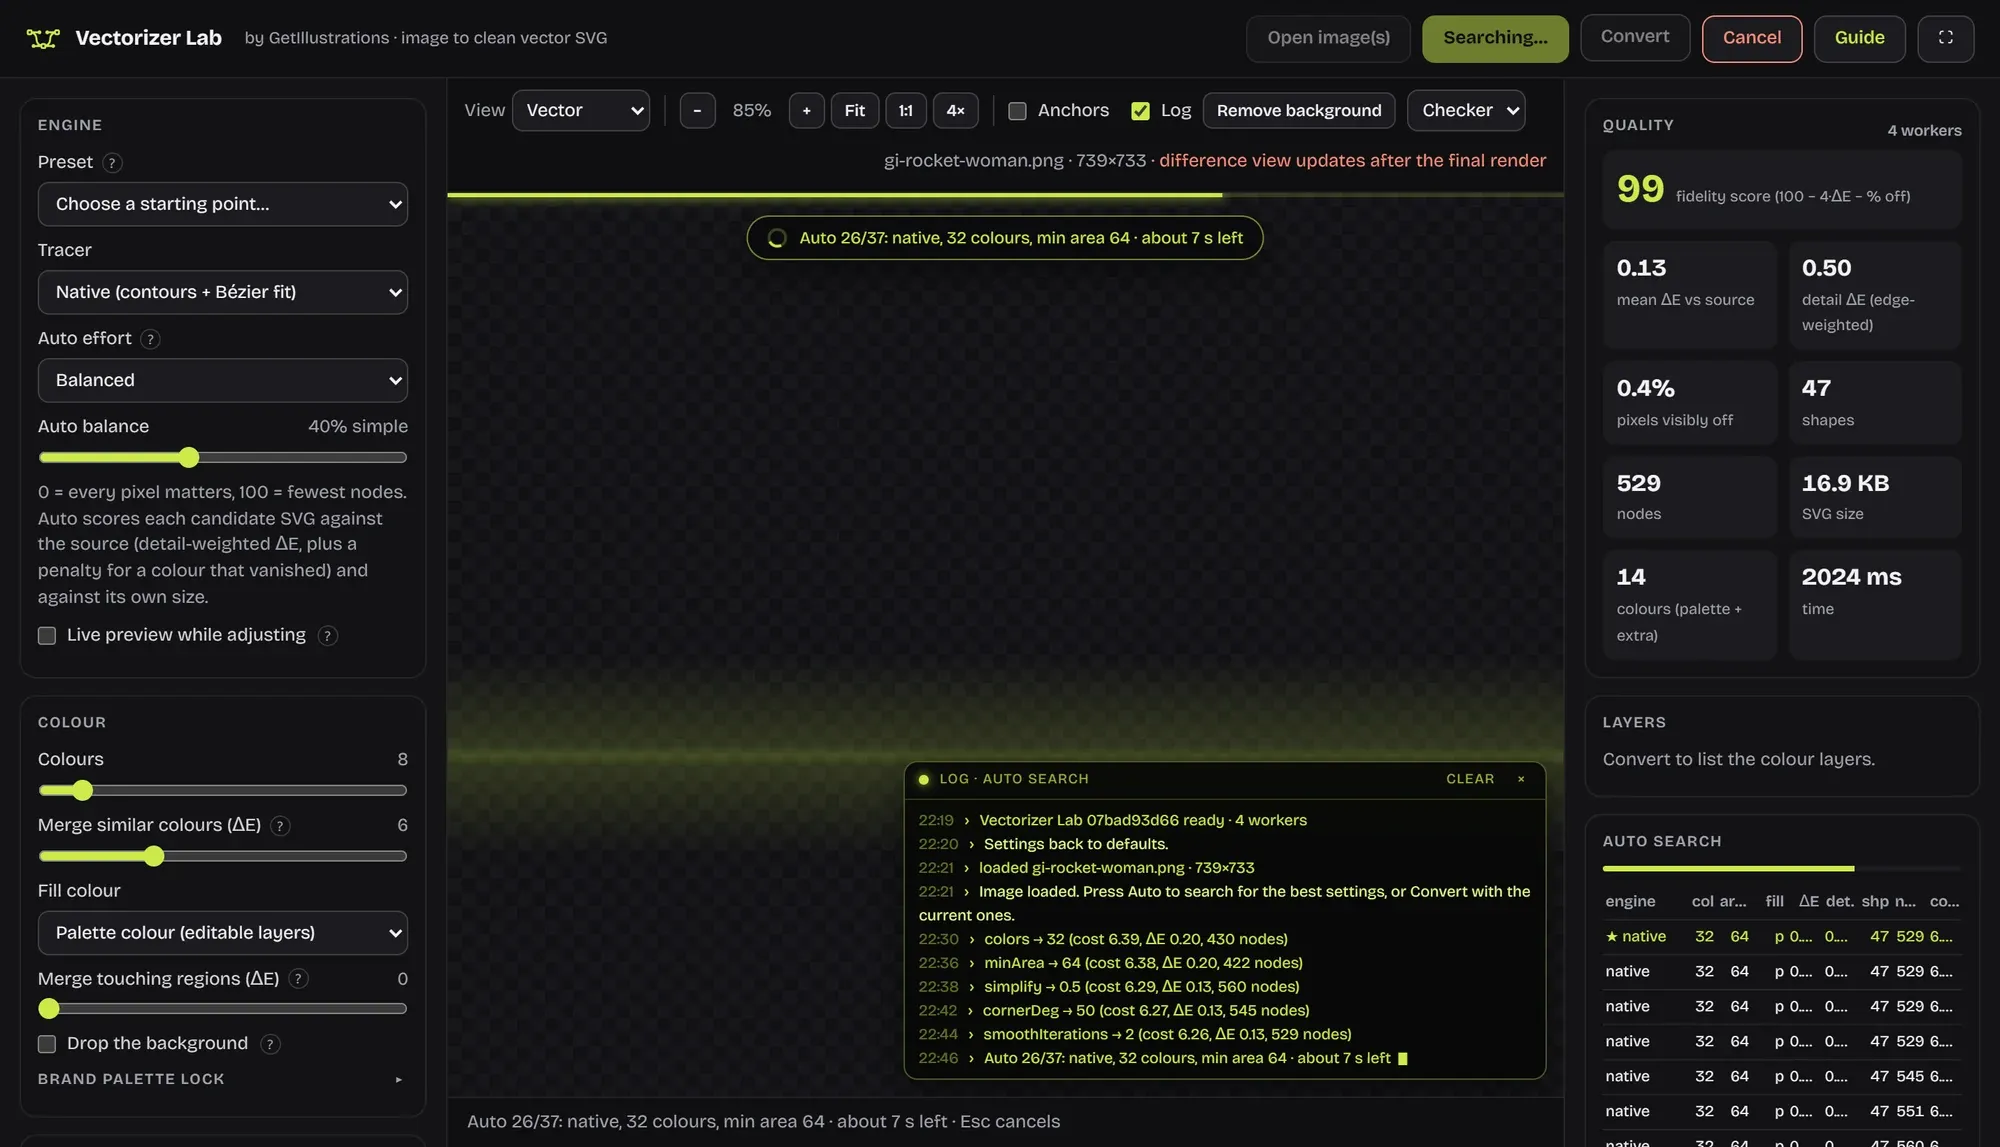
Two controls are worth knowing about. Auto effort sets how many candidates it tries for each engine: 16 on Fast, 37 on Balanced and 52 on Thorough.
Auto balance sets the tradeoff, from 0, where every pixel matters, to 100, where the fewest nodes win. The default of 40 is a good middle for most work.
Tune it by hand
Prefer to drive? Set the Colours slider (2 to 64), Min region area for how small a speck can be, Simplify tolerance for how many nodes you get and Corner threshold for sharp versus round corners. Then press Convert.
Tick Live preview while adjusting if you want to watch a quick version update as you drag. It traces a 600 pixel copy, so press Convert before you export.
How to check the quality of your SVG
This is the part most guides skip, and it's the part that saves you a reprint.
Read the fidelity score
After every trace, the Quality panel scores the SVG against your original out of 100. The score drops for average color difference across the image and for the share of pixels that are visibly off. Next to it you get the shape count, the node count and the file size, so you can see what that accuracy costs.
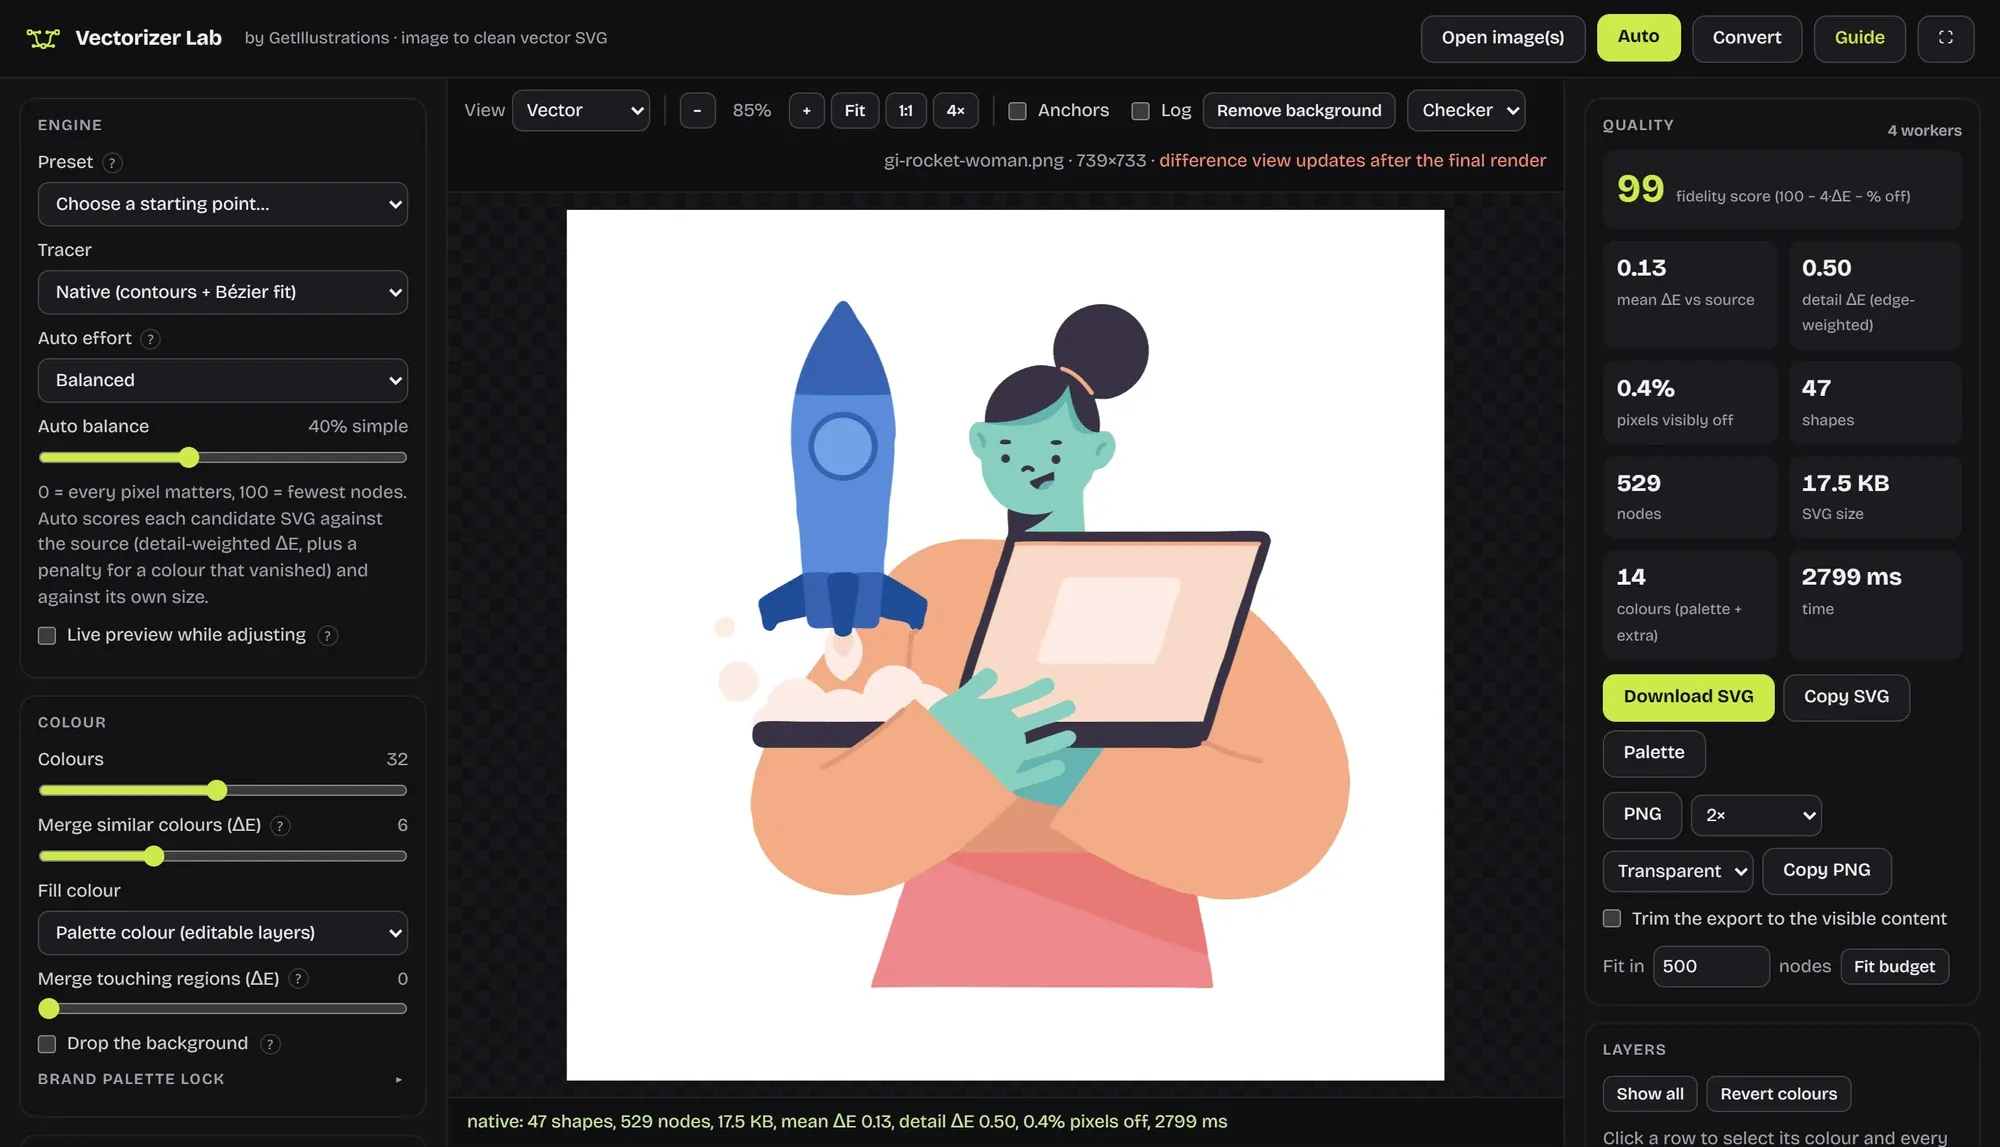
The color difference behind the score works on a simple scale: 1 is invisible, and 5 is a visible shift on a flat area. In our tests, a score in the high 90s looked identical at normal size, and in the 80s we could spot differences in shading and small details.
Compare it with the original
Switch the View menu to Compare and drag across the image to wipe between the PNG and the SVG, or use Onion skin to fade one over the other. Hold Space to peek at the original. Tick Anchors and every node shows up, which is handy if you plan to edit the paths.
Difference view colors every pixel by how far the SVG strays from the original. Green means it matches, and it shifts toward red where the colors are off.
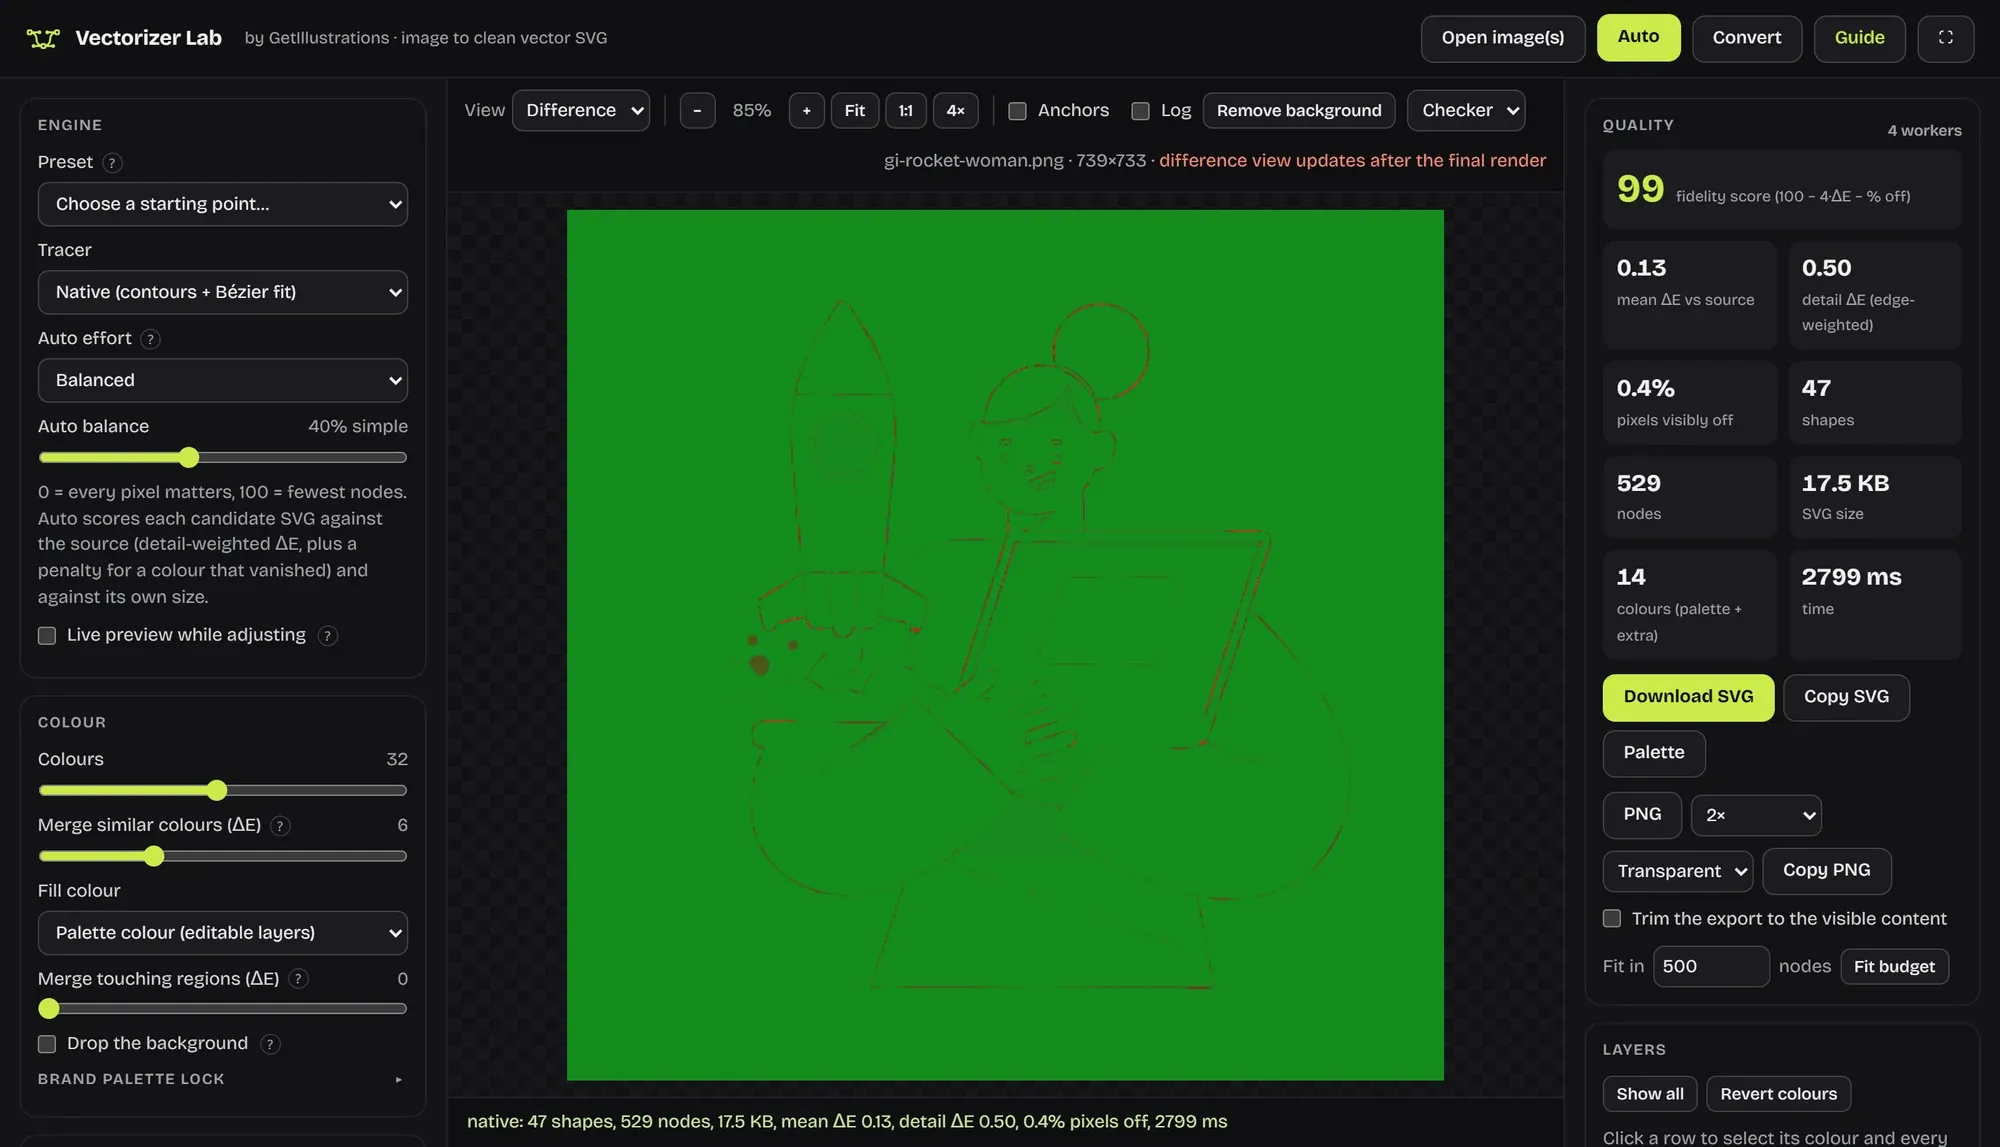
Zoom into faces and small marks before you sign off. In our Journey example, a tiny dot of an eye merged into the line next to it, which is easy to miss at normal size.
The two controls that look after small marks like that are Min region area and Keep small details.
Make sure it's a real vector, not a PNG inside an SVG
If your SVG looks blurry when you zoom in, it probably isn't a vector at all. Some converters wrap the original pixels in an SVG file and stop there. Open the file in any text editor and look at what's inside.
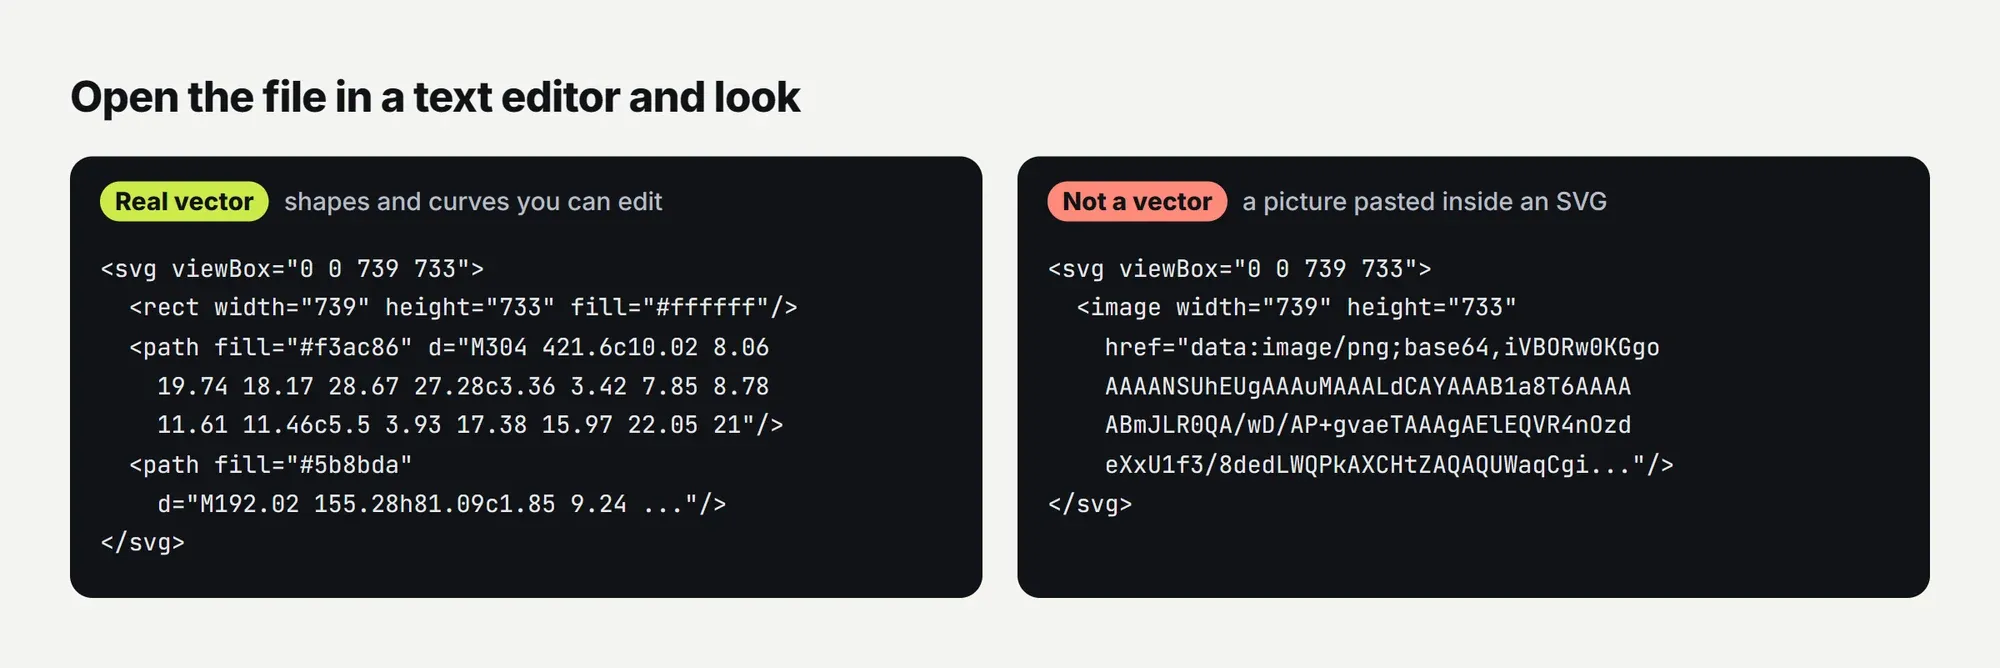
A real vector is made of path, rect and ellipse elements full of coordinates. A fake one has a single image element with a huge block of gibberish, which is your PNG encoded as text. Vectorizer Lab only writes real shapes.
How to convert PNG to SVG with color and layers
Set the number of colors
The Colours slider sets the palette size, from 2 to 64, with 8 as the default. Merge similar colours joins palette entries that are nearly the same, so you don't end up with three almost identical blues. Fill colour decides how shapes get painted: Palette colour gives you editable color layers, Each shape's own average colour stays closer to the original, and Gradient where shading varies adds one gradient per shape where the art needs it.
If you want a layered SVG you can recolor later, keep Fill colour on Palette colour. Auto sometimes picks the average color mode for detailed art, because it scores closer to the original.
Recolor or merge colors after the trace
Every color shows up as a layer in the Layers panel. Untick one to hide it, click its swatch to recolor it, or click a row to select that color and every similar shade. From there you can recolor them together, merge them into one, or hide them.
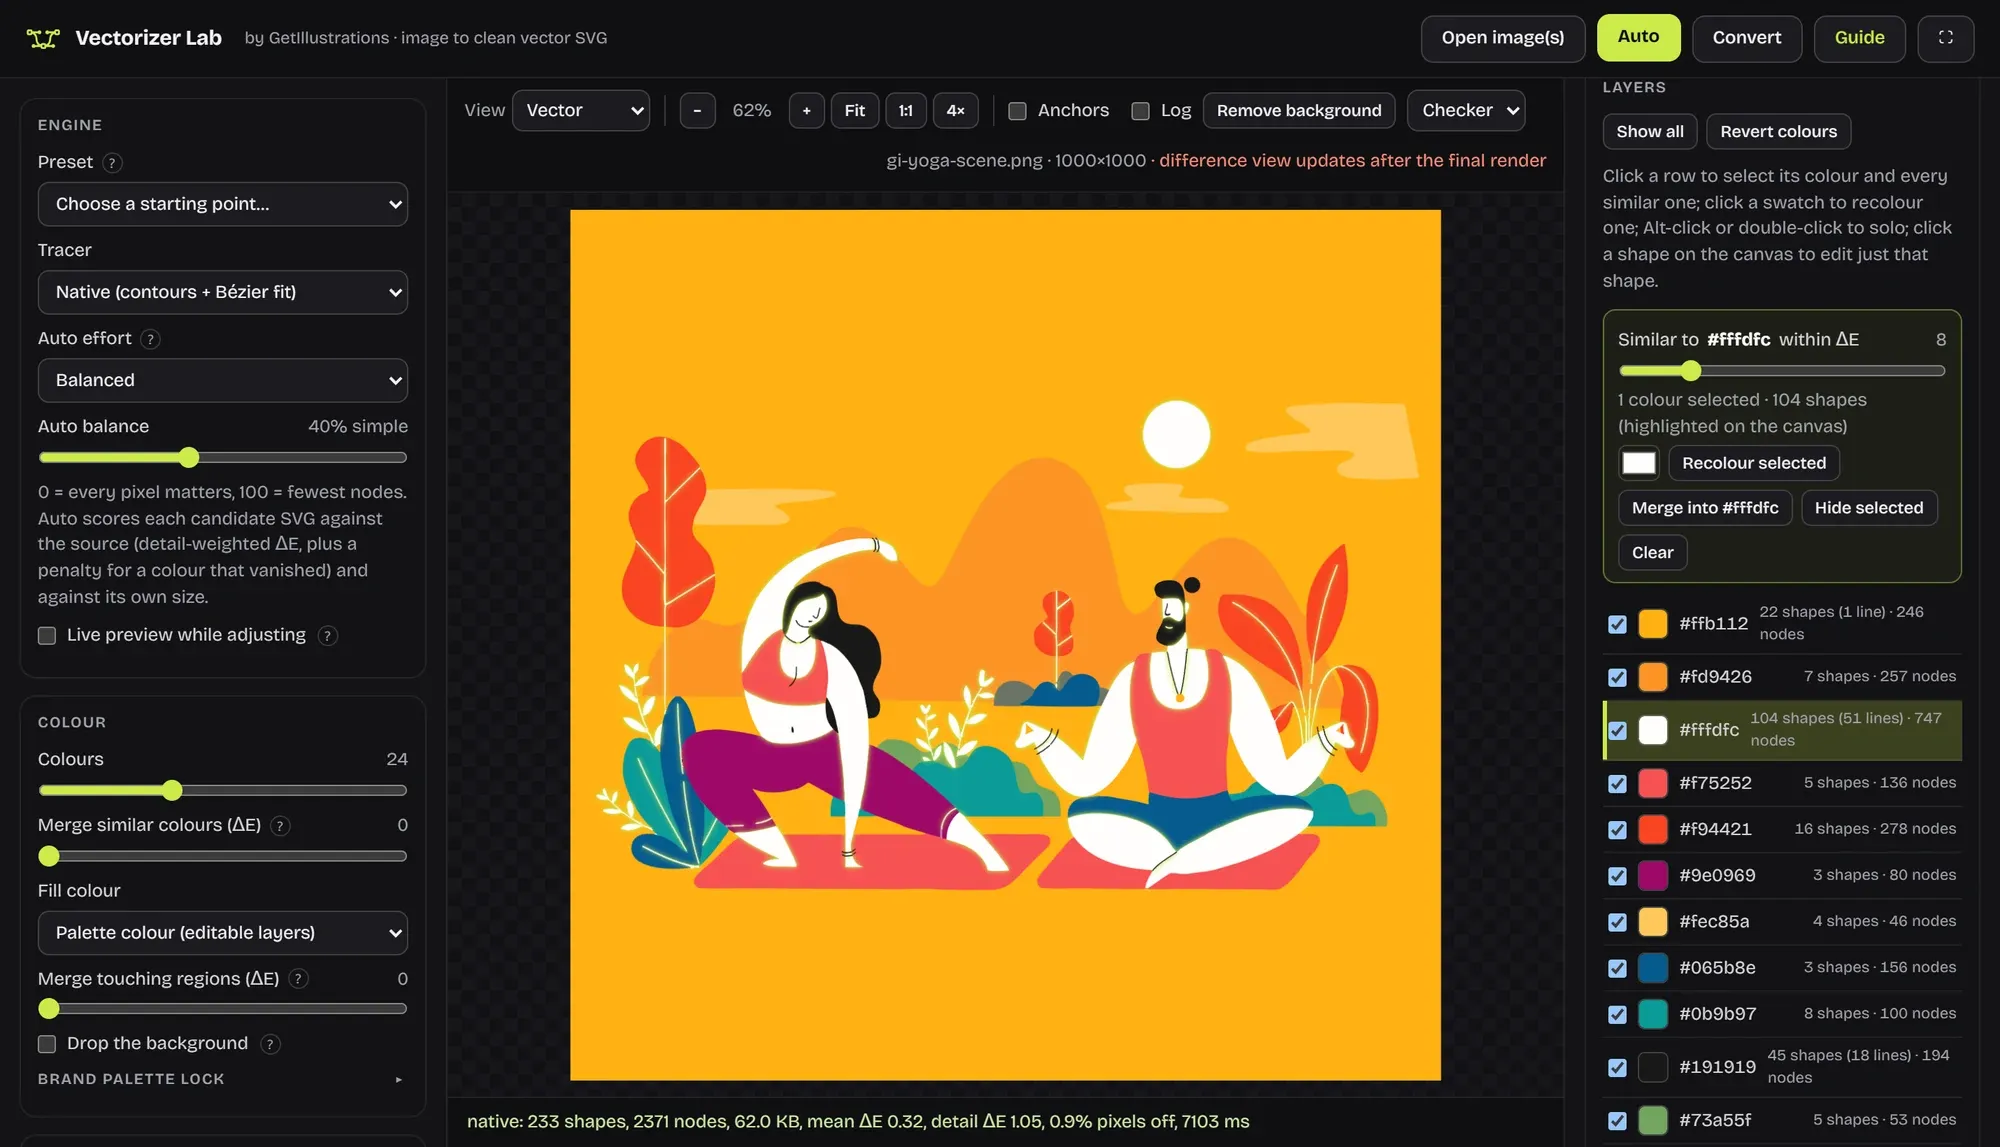
Working to brand colors? Open Brand palette lock, tick Use only these colours and type your hex values, and the trace will only use those. For changing colors later, our free SVG color editor handles any SVG file.
Remove the background
Press Remove background in the toolbar and the largest shape touching the edges disappears, along with every other shape of that color that touches the edge. Tick Trim the export to the visible content and the SVG is cropped tight around what's left. PNG exports can be transparent too.
Stacked or cutout layers for Cricut and laser cutters
Under Curves and output, Layering has two modes. Stacked lays shapes on top of each other so no gaps show between them, which is what you want for screens and print. Cutout cuts holes so shapes never overlap and gives you one named layer per color, which works better for cutting machines.
How to vectorize a logo, a drawing or line art
Logos and icons
Start with the icon and logo preset, which keeps corners crisp and the palette small. When it's done, click Copy SVG and paste it into Figma or Illustrator, and the shapes arrive as editable objects. Remember that any text in the logo comes back as outlines.
Line art and sketches
Scan or photograph the drawing flat, in even light, and start with the line art preset. Lines of even width come back as real SVG strokes, so you can change their thickness later in your design app. Tapered, hand drawn lines stay as filled shapes, which keeps their character.
If you'd rather redraw a sketch properly by hand, here's how we take a sketch to a clean vector.
Pixel art
Choose the pixel art preset and every pixel comes back as an exact square, even if the sprite was saved at a bigger size. For more on that, see our tutorial on vector pixel art in Illustrator, or turn a photo into pixel art with Pixel Lab.
Vectorizer Lab vs Illustrator Image Trace, Inkscape and online converters
Every tool here can turn a PNG into an SVG. They differ in cost, setup and how much control you get, so here's how they compare.
| Tool | Cost | Setup | What stands out |
|---|---|---|---|
| Vectorizer Lab | Free, no account | Nothing to install | Auto settings search, a fidelity score, color layers you can edit after tracing, batch conversion |
| Illustrator Image Trace | Creative Cloud subscription | Install Illustrator | Good presets and EPS or PDF export, but you Expand the trace before you can edit its paths |
| Inkscape Trace Bitmap | Free | Install Inkscape | Single or multiple scans by brightness or color, tuned by hand |
| Vectorizer.AI | Free preview, paid plan to download | Works in the browser | Fast, and exports EPS, PDF and DXF as well as SVG |
| Simple online converters | Usually free | Works in the browser | One click and little control. Some only wrap your PNG inside an SVG |
If you already live in Illustrator, Image Trace is fine, though you'll need to Expand it before you can edit the paths. Inkscape is a solid free choice if you don't mind installing it and tuning it by hand.
If a printer insists on EPS or PDF, or you need results in seconds, Vectorizer.AI is worth paying for, because Vectorizer Lab only exports SVG, PNG and a palette file. When you want a free image trace alternative with a measured result, that's what we built Vectorizer Lab for.
How to edit your SVG in Figma, Illustrator or Inkscape
Copy SVG puts the whole file on your clipboard. Paste it into Figma, Illustrator, Inkscape or Affinity and the shapes come in editable, grouped and named, with lines and dots in their own groups. Download SVG saves the file at your image's real pixel size.
Each file also carries a short credit and a settings link inside its metadata. Open that link later and the studio loads the same settings for the next image, which is handy for tracing a whole set the same way.
Where to get free SVG illustrations
Tracing is the right move for your own logo or a drawing you made. When you need illustrations for a website, an app or a deck, starting from a real vector saves you all of the above.
Every pack in our illustration packs library ships as editable SVG and PNG, drawn as vectors from the start, with a commercial license. There's a set of free SVG illustrations to try, and if you'll use a lot of them, every pack in one plan is usually the better deal.
Frequently asked questions
Is Vectorizer Lab really free?
Yes. There's no account and no watermark on the exports, and SVG, PNG, palette and batch ZIP downloads are all free. Each SVG carries a short credit line and a settings link inside its metadata.
Why is my SVG blurry after converting a PNG?
Usually because it's still the PNG, wrapped inside an SVG file with an image tag. Open it in a text editor to check. A tiny source image can also trace roughly, so start from the biggest copy you have.
Can I convert a PNG to SVG for Cricut or a laser cutter?
Yes. Set Layering to Cutout so shapes don't overlap and each color gets its own named layer, press Remove background, tick Trim the export to the visible content, then Download SVG.
Can you vectorize a photo?
You can, but it turns into a poster made of color bands rather than a photo. Use the photo poster preset or the 3D render preset, and expect bigger files: our photo and painted scene tests ran from about 240 KB to 1.1 MB.
Will the text in my image stay editable?
No. Letters become outline shapes. Small lettering is kept whole, but you'll need to retype any text you want to edit.
Can ChatGPT convert an image to a vector?
A chat assistant can write simple SVG code, but it redraws your picture from a description rather than tracing your pixels, so shapes and proportions tend to drift. A tracer follows the actual edges, and Vectorizer Lab tells you how close it got.
Can I convert many images at once?
Yes. Drop several files and use Convert all or Auto all (fast). You get one ZIP with every SVG plus a report of how each one scored.
Convert a PNG to SVG for free
Pick the PNG that's been bugging you, drop it into Vectorizer Lab, press Auto and check the score before you send it anywhere.