
How to Increase Image Resolution Without Losing Quality
Learn how to increase image resolution, upscale low quality photos and restore old family pictures for free, plus how many pixels every print size needs.

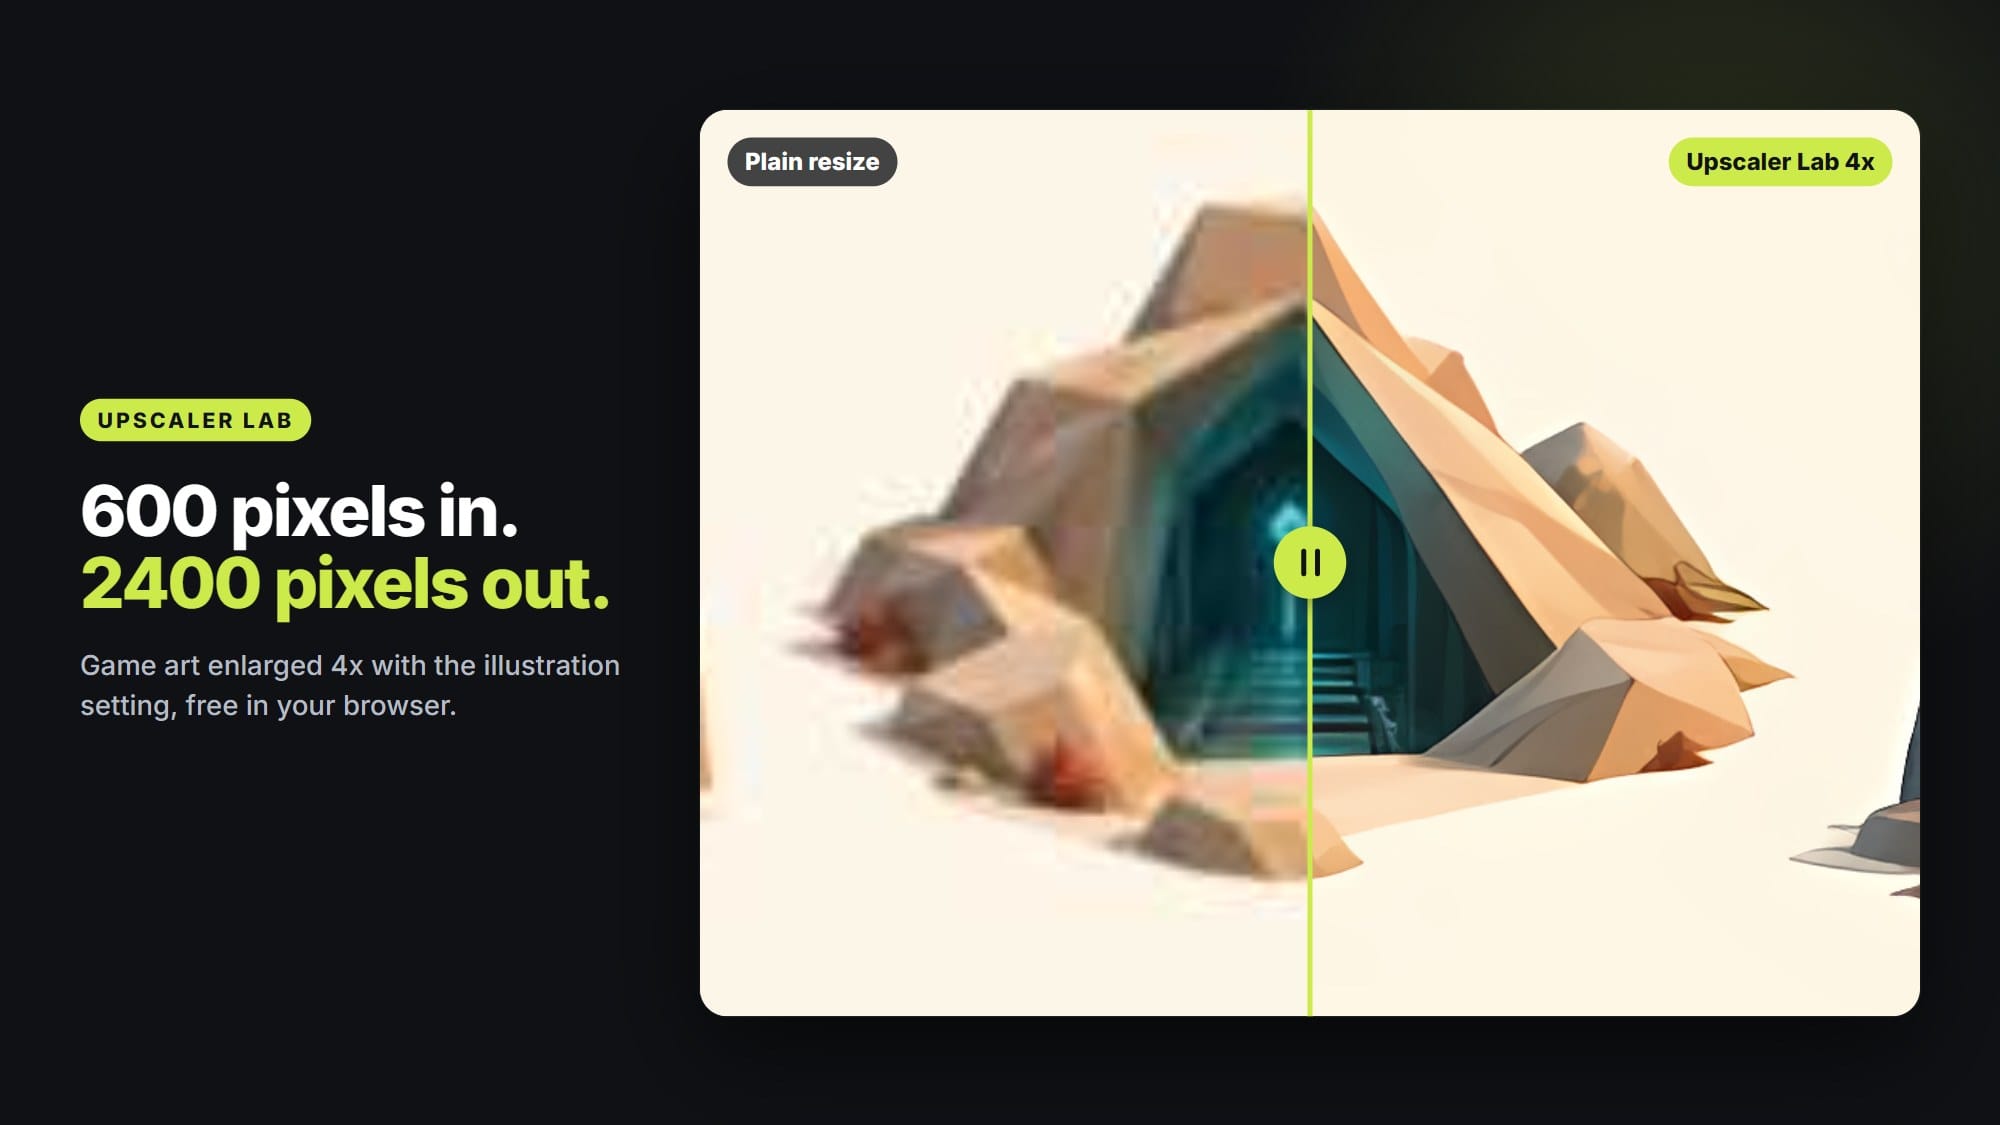
Someone sends you the photo for a poster. It looks great on their phone. Then you open it on your desktop and it's 900 pixels wide, a little soft, with blocky JPEG squares around every edge, and the print shop wants 300 DPI.
You can increase the resolution of that image. What you can't do is turn it into a photo it never was. Most advice online blurs those two things together, so this guide keeps them apart: what actually adds pixels, what only changes a number in the file, how many pixels a print really needs, and how to fix what's wrong with your picture before you enlarge it.
We built a free image upscaler for exactly this job, and for its harder cousins: upscaling low quality phone photos and restoring old family pictures. I'll walk you through all of it further down, but the first half of this guide works with any tool.
Can you increase the resolution of an image?
Yes, if by resolution you mean pixels. Any image can be made bigger, and a photo 1000 pixels wide can become 4000 pixels wide in a few clicks.
The catch is detail. A small file only recorded so much, so when you enlarge it the new pixels have to come from somewhere.
A plain resize averages the pixels around each gap, which is why it looks soft. An upscaling model has learned from huge numbers of photos at small and large sizes, so it predicts the sharp edges, hair and fabric that probably belong there.
Predicted, though. Not recovered.
That gives you a rule worth remembering. Up to about 4x, a good upscale holds up at normal viewing distance. Past 4x, most of what the model adds is invented, and it starts to show as painted texture and soft edges when you get close.
Four things decide how well it goes:
- How small the file is
- How compressed it is (those JPEG blocks)
- Whether it's blurry from camera shake or missed focus
- What kind of picture it is: a photo, a logo, a screenshot or pixel art
How to increase image resolution in six steps
The short version, with each step covered further down:
- Work out how many pixels you need. For a print, that's the size in inches times 300.
- Find the largest original you can get.
- Crop and straighten first, so you only enlarge what you keep.
- Fix the real problem before enlarging: blur, noise or compression.
- Upscale 2x to 4x with an upscaling model, not a plain resize.
- Check the result at 100% zoom, then export a PNG for print or a WebP for the web.
Step 2 is the one everyone skips. A photo sent through a messaging app has usually been shrunk and compressed on the way, and the original is still sitting on someone's phone. Ask for it before you try anything clever.
Does changing the DPI increase resolution?
No. This one trips up a lot of people.
DPI (dots per inch) is an instruction to the printer about how tightly to pack the pixels on paper. It's stored in the file as a plain number, and changing that number adds nothing. Take a photo that's 1200 by 1800 pixels: at 300 DPI it prints at 4 by 6 inches, and at 150 DPI the very same pixels print at 8 by 12 inches, just spread twice as far apart.
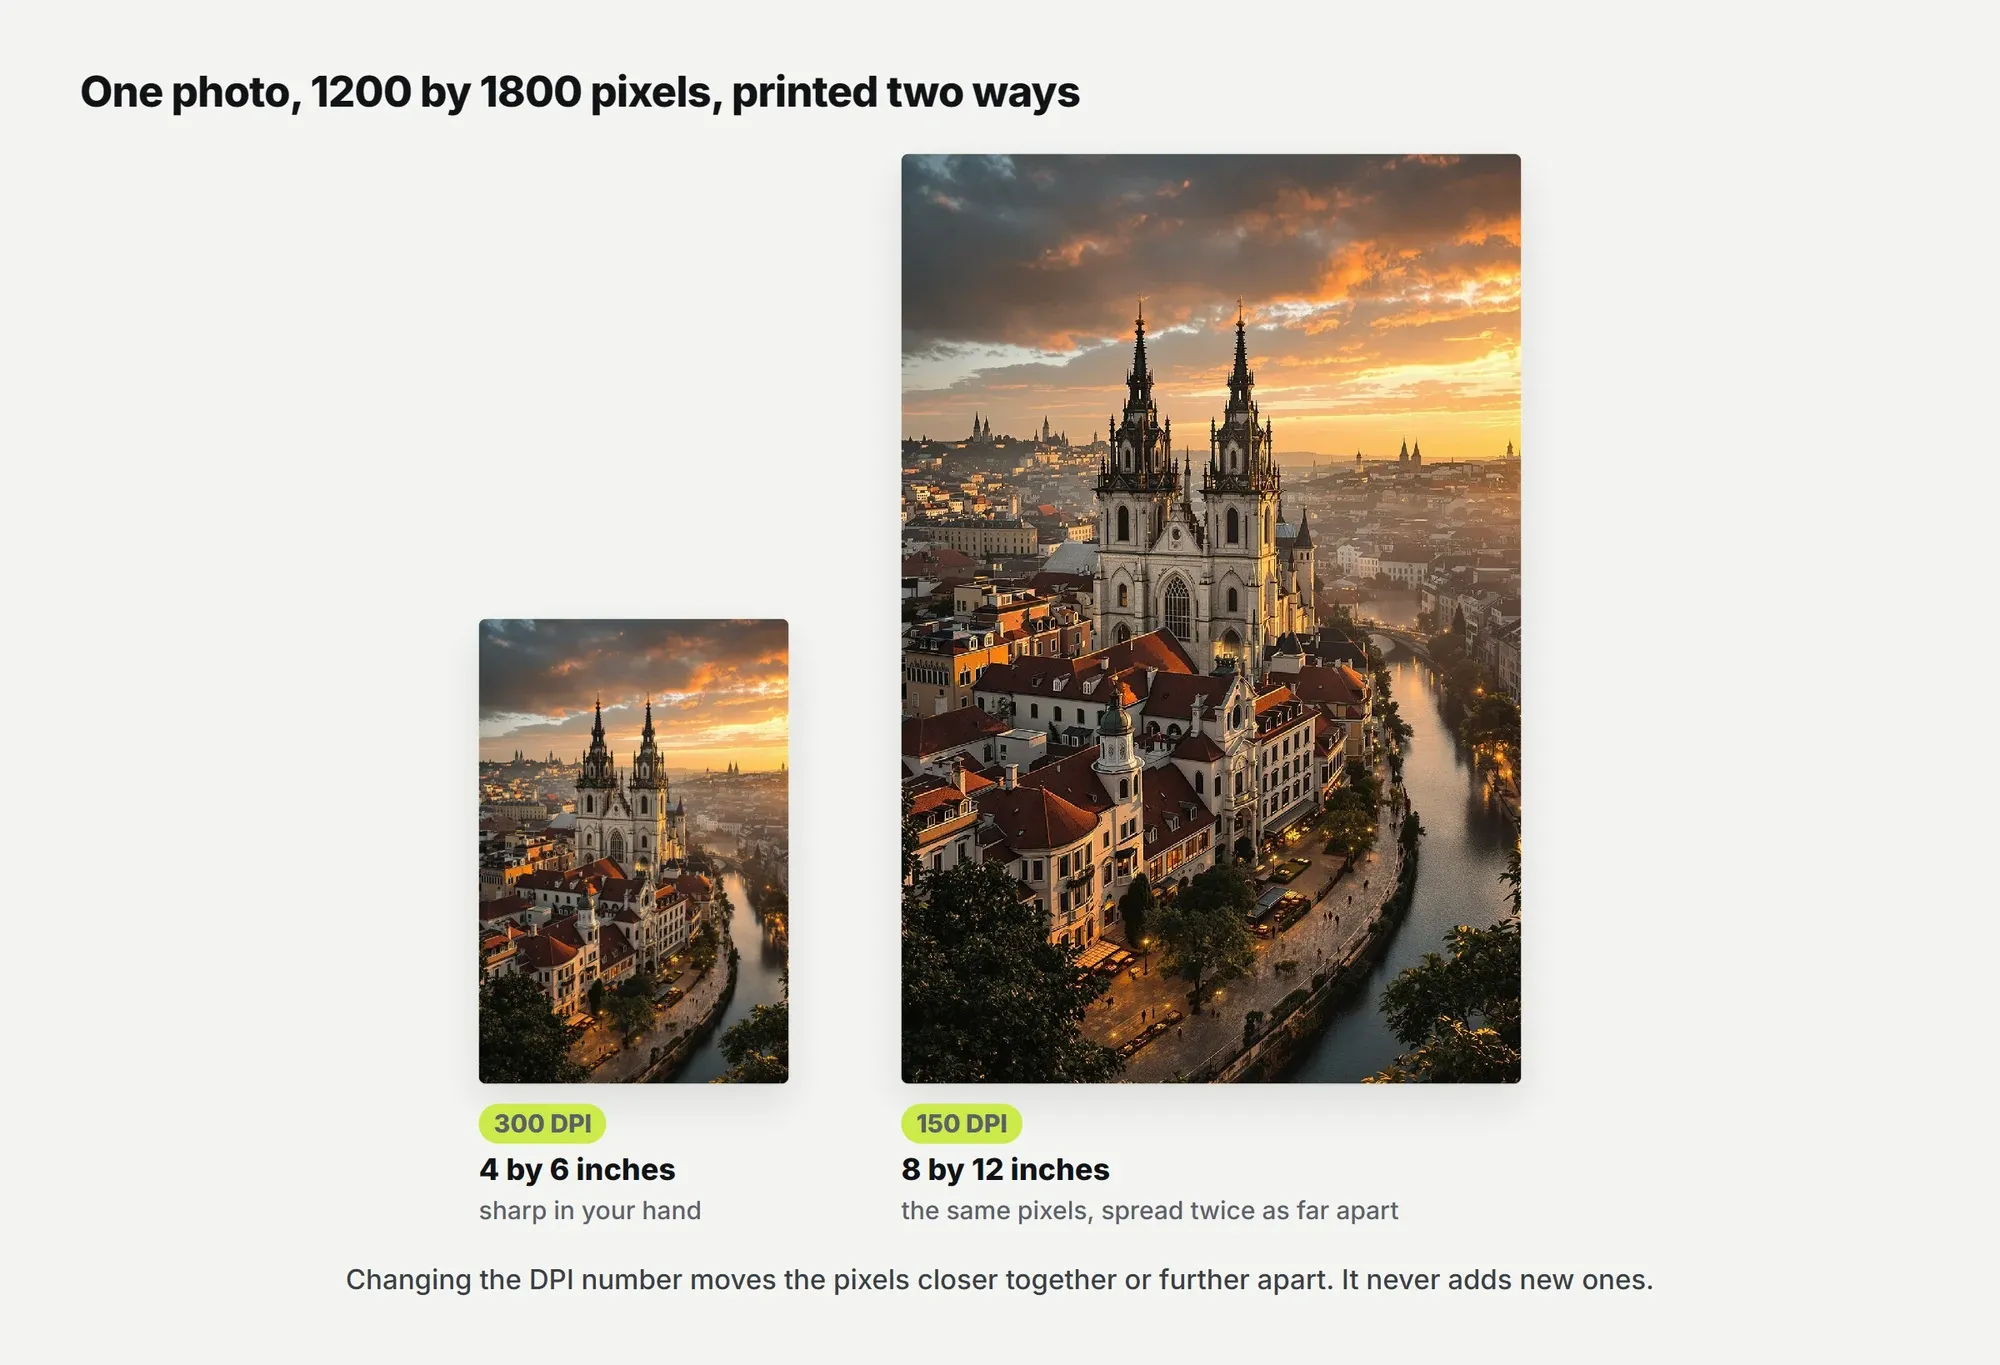
When a print shop asks for 300 DPI, what they really mean is enough pixels to print your size at 300 DPI. Typing 300 into the resolution box in Photoshop with resampling switched off changes the label and nothing else. To increase image resolution to 300 DPI for printing, you need more pixels, not a new number.
How many pixels do you need to print a photo?
Multiply the print size in inches by 300, and that's the resolution your image needs for printing. For metric paper sizes, divide the millimeters by 25.4 first.
300 DPI is the standard for anything people hold in their hands, like photos, flyers and books. Posters and banners are seen from a few feet away, and 150 DPI is usually plenty there. That halves the pixels you need in each direction, which makes a big difference when your file is small.
| Print size | Pixels at 300 DPI | Megapixels | Pixels at 150 DPI |
|---|---|---|---|
| 4 by 6 inches | 1200 by 1800 | 2.2 | 600 by 900 |
| 5 by 7 inches | 1500 by 2100 | 3.1 | 750 by 1050 |
| 8 by 10 inches | 2400 by 3000 | 7.2 | 1200 by 1500 |
| 8.5 by 11 inches (US Letter) | 2550 by 3300 | 8.4 | 1275 by 1650 |
| 11 by 14 inches | 3300 by 4200 | 13.9 | 1650 by 2100 |
| 16 by 20 inches | 4800 by 6000 | 28.8 | 2400 by 3000 |
| 18 by 24 inches | 5400 by 7200 | 38.9 | 2700 by 3600 |
| 24 by 36 inches | 7200 by 10800 | 77.8 | 3600 by 5400 |
| A5 (148 by 210 mm) | 1748 by 2480 | 4.3 | 874 by 1240 |
| A4 (210 by 297 mm) | 2480 by 3508 | 8.7 | 1240 by 1754 |
| A3 (297 by 420 mm) | 3508 by 4961 | 17.4 | 1754 by 2480 |
| A2 (420 by 594 mm) | 4961 by 7016 | 34.8 | 2480 by 3508 |
| A1 (594 by 841 mm) | 7016 by 9933 | 69.7 | 3508 by 4967 |
Short of the 300 DPI numbers? Check the 150 column before you panic. A photo 2400 pixels wide won't make a sharp 16x20 print you inspect up close, but it'll make a perfectly good one on a wall.
Very large prints run into a second limit, which is memory. A 24x36 poster at 300 DPI is almost 78 megapixels, more than a browser tab can comfortably enlarge in one go.
Our upscaler caps the model's output at around 40 megapixels and tells you when it did. For a poster that size, 150 DPI is the realistic target anyway.
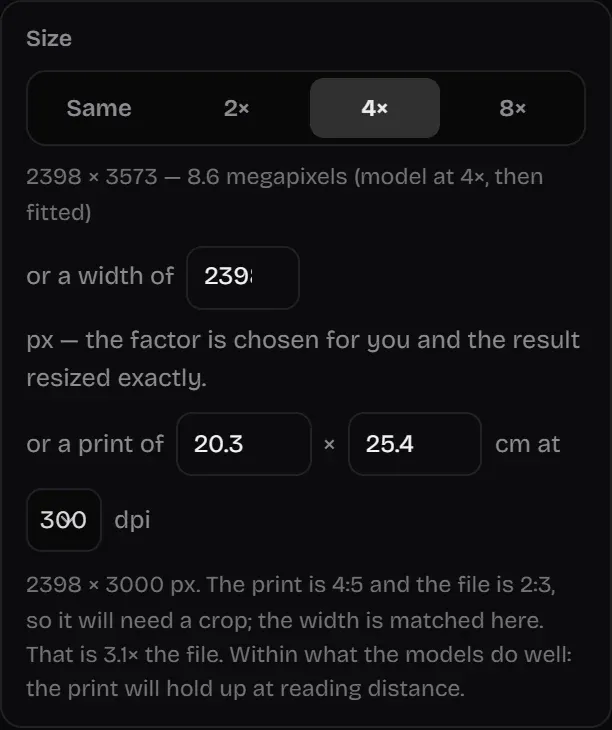
In Upscaler Lab you can type the print size straight in. It works in centimeters (an 8x10 inch print is 20.3 by 25.4 cm), and it tells you how many times your file is being enlarged, with a plain note on whether that's within what the models do well.
Resize or upscale: which one should you use?
What a plain resize does
Every image editor can resize: Photoshop, GIMP, Preview, Canva. When you make an image bigger this way, the software fills the new pixels by blending the ones around them. The method names you'll see are nearest neighbor, bilinear, bicubic and Lanczos.
Nearest neighbor copies pixels as hard blocks, which looks awful on photos and perfect on pixel art. The others blend smoothly, so edges turn soft instead of jagged. For a small enlargement, say up to 1.5x or 2x on a print seen from a distance, a good bicubic resize is often enough.
That's also what people mean when they search for how to upscale an image without AI. Classic resampling, no model involved.
What an upscaling model does
An upscaling model is trained on pairs of the same photo at a small and a large size, so it learns what real edges and textures tend to look like. If you want to enlarge a photo without losing quality, this is the part that matters: at 2x to 4x a model usually keeps edges crisp where bicubic goes mushy, and it can clean up compression blocks on the way.
The flip side is that it can invent or erase texture. Skin gets a bit too smooth, brickwork a bit too regular, and small lettering can quietly change shape. That's why the check below matters so much.
How to tell which one won
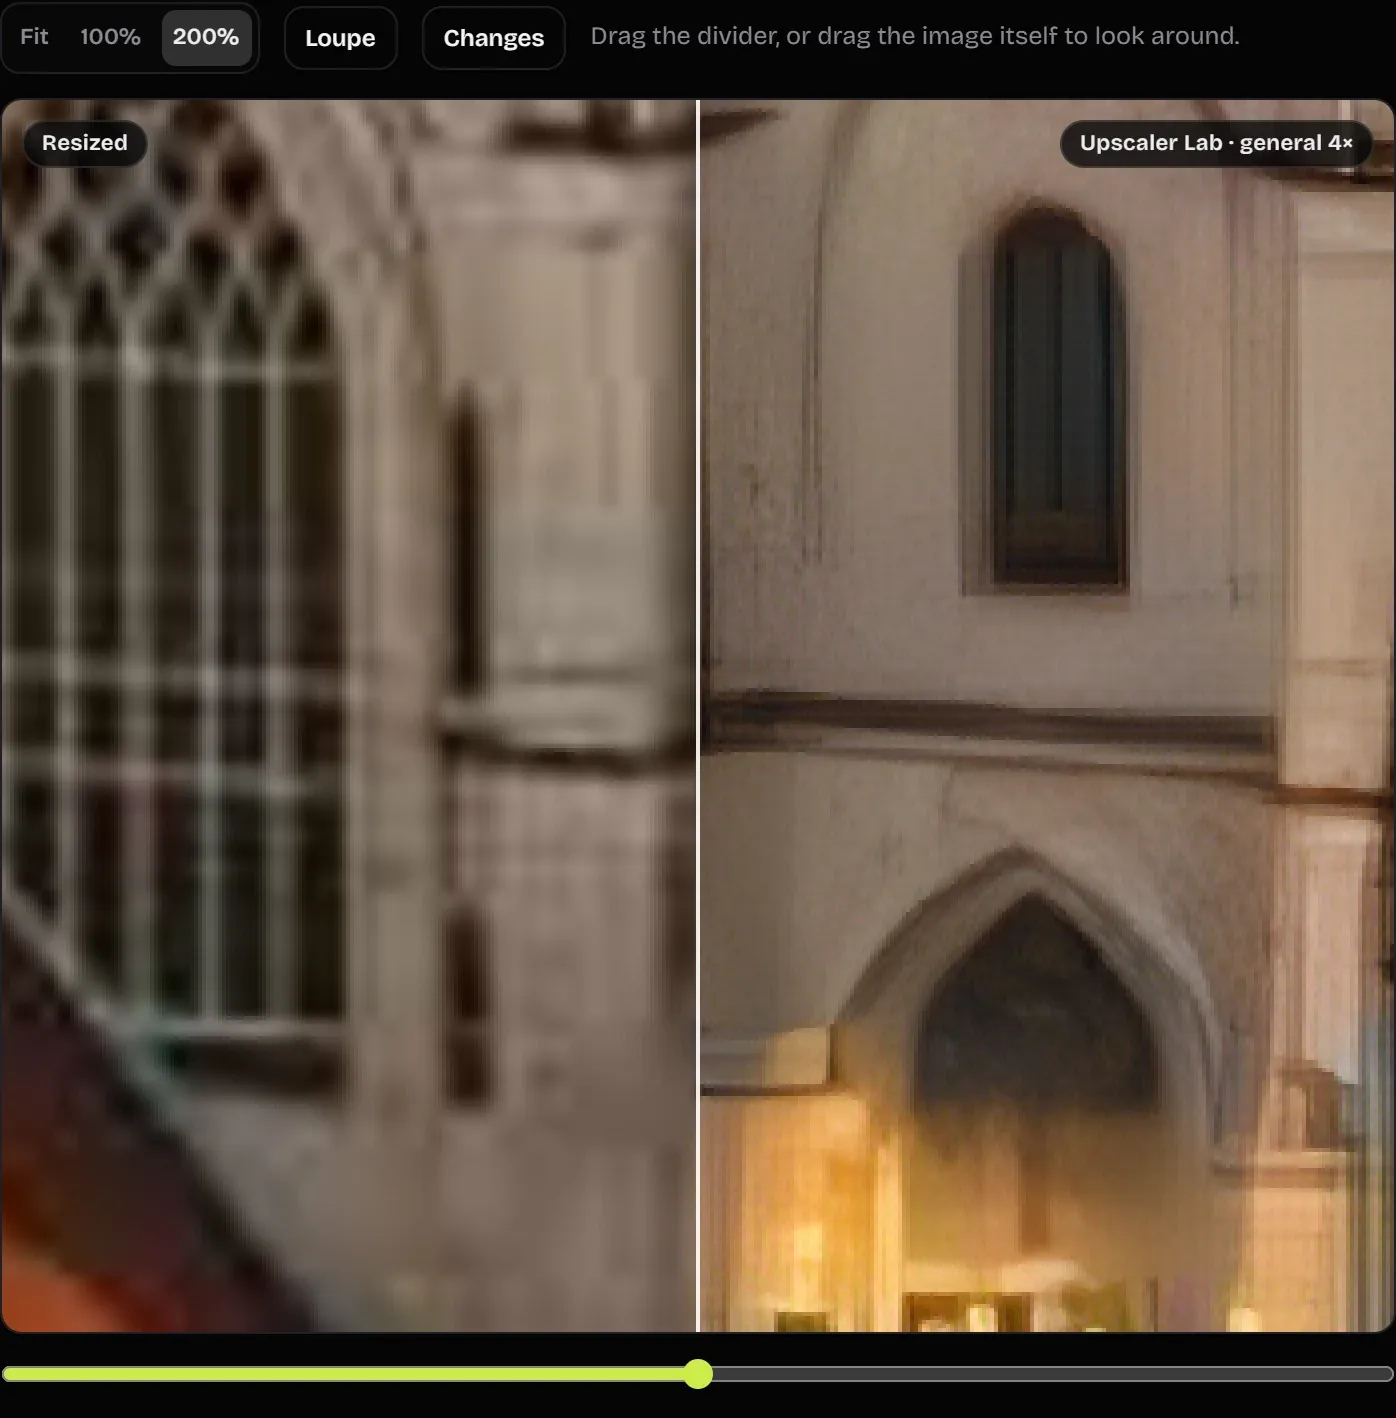
Compare them side by side at 100% zoom, on the part you actually care about: faces, text, the edge of a logo. At fit to screen everything looks fine, which is exactly why people get surprised at the print shop.
Upscaler Lab has this comparison built in. Set the compare menu to the plain resize option and drag the divider across the same detail. Press D and the Changes view colors every area where the model did something a resize wouldn't have.
How to upscale an image for free in your browser
Upscaler Lab is free, with no account and no watermark, and the enlarging runs in your browser tab, on your own graphics card when the browser supports WebGPU. Open the studio, drop in a picture and follow along.
Step 1: Drop the image and crop it first
Press Choose an image, drag a file onto the page or paste one. You can add several at once and they'll line up in a queue. On most browsers, export an iPhone HEIC photo as JPEG first.
If you only need part of the picture, use Crop before anything else. The tool itself points out that cropping before you enlarge is four times cheaper than enlarging everything and cropping after, because the model has fewer pixels to work through.
Photographed a printed photo lying on a table? Find the print locates it and pulls it flat for you.
Step 2: Read what the tool found
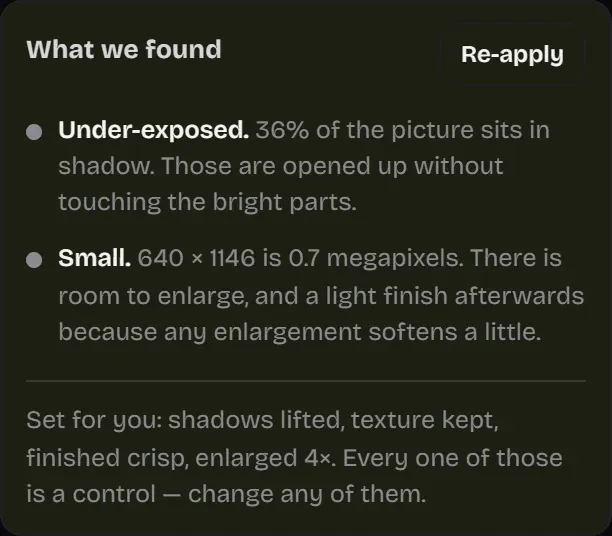
The panel called What we found lists what it measured in your file, such as noise, color noise, softness, a color cast, a small size or a faded print. Under that it sets the controls for you and tells you which ones it changed. Every one of them is still yours to change.
Quality has three settings. Quick uses the fastest model, Balanced is what the diagnosis picked, and Best uses the repair model and keeps more texture at roughly three times the time. If you can't decide, Try all three on a crop runs them side by side on a small area and shows how long each took.
Step 3: Tell it what kind of image it is
The question What is this image? has five answers: Photograph, Illustration or logo, Anime or comic, Screenshot or text, and Pixel art. The tool sets it for you, but this choice picks the model, so check it.
Pixel art is the odd one out. No model runs at all. The grid is recovered and enlarged as exact square blocks.
Step 4: Choose the size
Pick 2x, 4x or 8x. You can also type an exact width in pixels, and the tool chooses the factor and resizes the result to exactly that width. The third option is a print size in centimeters at 150, 200 or 300 dpi.
8x runs as two passes. Use it rarely, because at that size most of what the model adds is invented.
Step 5: Press Enhance and check it at 100%
Press Enhance. On a recent desktop graphics card with WebGPU, a typical photo takes seconds. Without WebGPU it runs on the processor and takes a good deal longer, and the bar at the top of the studio tells you which path you're on.
The first run also downloads the engine and a small model, roughly 15 to 30 MB, which your browser keeps for next time. Bigger optional models, like the 340 MB face model, download only when you switch them on.
When it's done, switch to 100% or 200%. Use the Loupe (press L), hold Space to flash the original, and press D for the change map. If the tab slows down after many heavy runs, a fresh tab fixes it.
Step 6: Finish and download
The Finish the result panel adjusts the output without running the model again. Strength blends the result back toward a plain resize if it looks too polished, and Sharpen, Grain and Background (keep it, remove it or swap in a solid color) sit right next to it. There's also a brush for removing objects and dust.
Download a PNG for print, a WebP for the web or a JPEG for email. With a queue, Run all and Download ZIP handle the whole batch.
A note about your files. The enlarging happens in your browser, not on our server, but GetIllustrations keeps a copy of each file you add so we can watch the tool for abuse. Your results aren't copied.
How to upscale a low quality photo
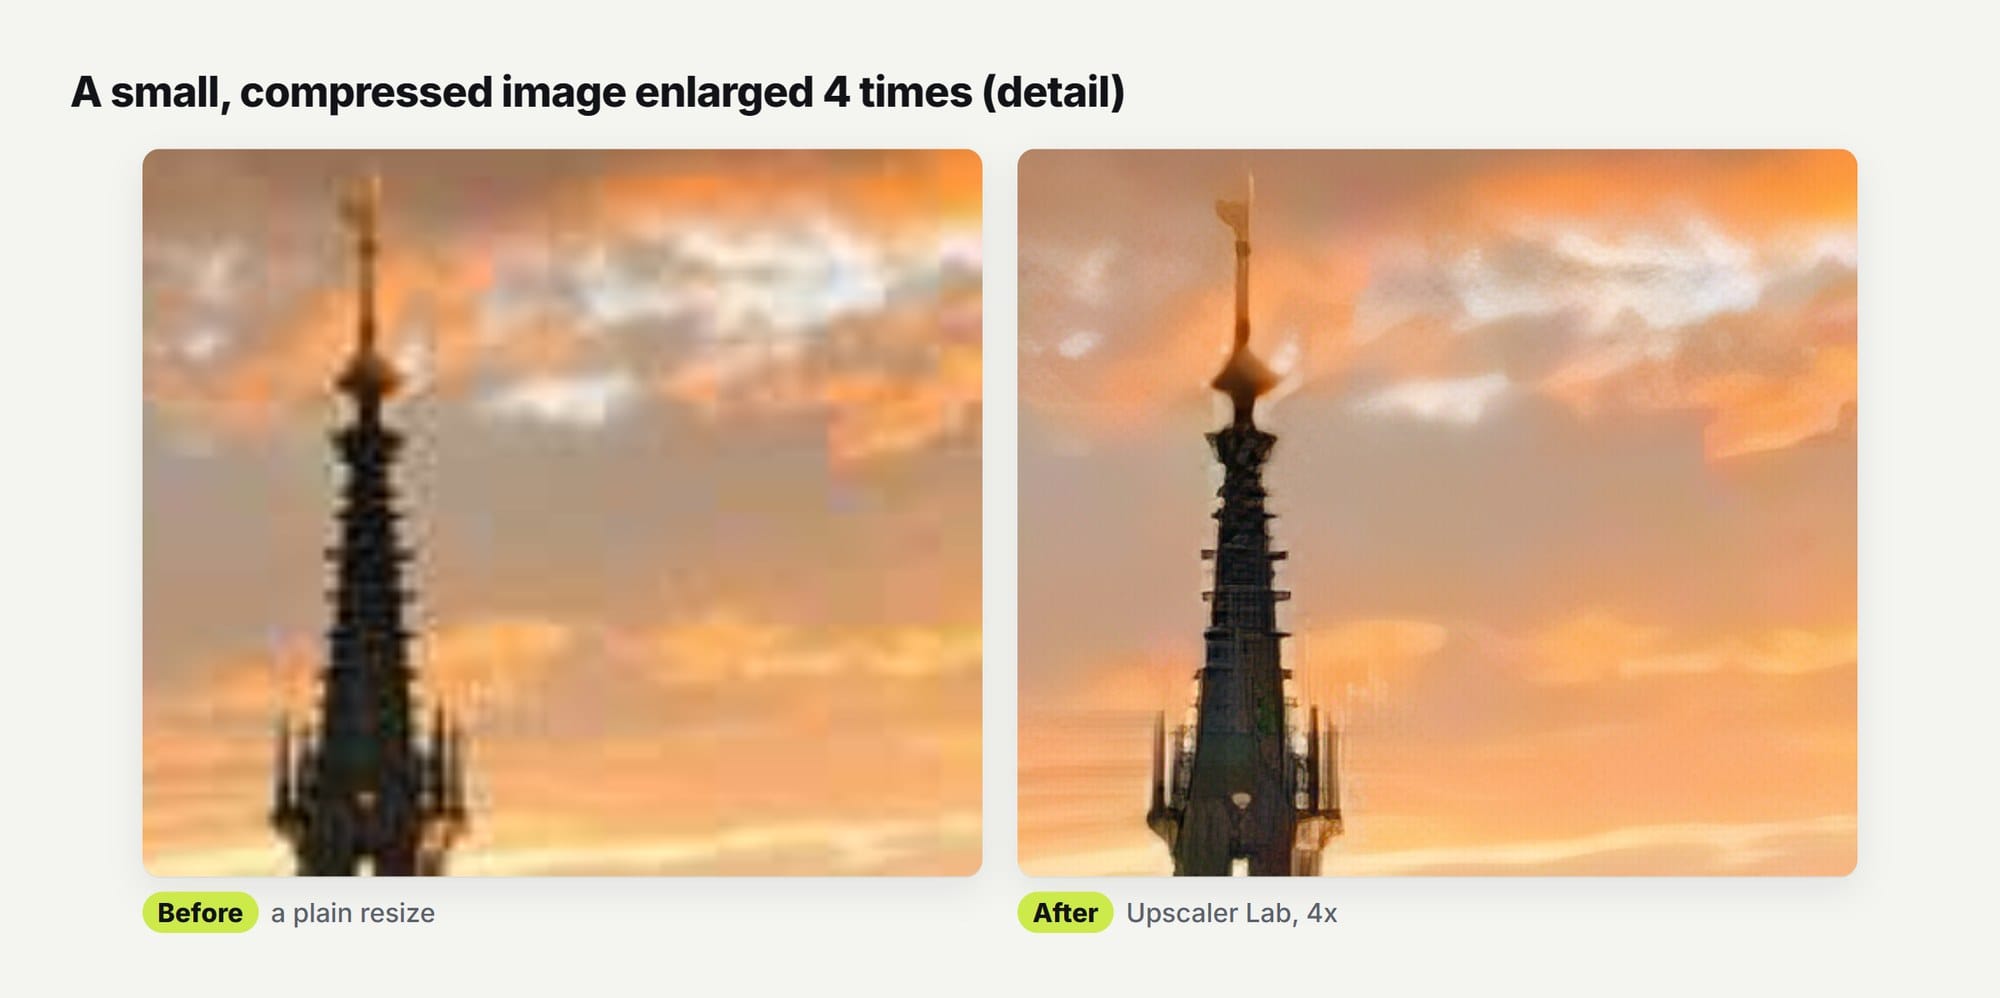
Low quality photos are where upscaling helps most, and where it goes wrong most often. Enlarging magnifies whatever's wrong with a picture, so fix that first and you improve the photo's quality as well as its size.
Blocky, pixelated JPEGs
Those squares come from heavy compression, often from a messaging app or a screenshot of a screenshot. Set Noise and JPEG artefacts to Clean, or to Hard for bad cases.
For phone photos that went through WhatsApp or something similar, tick Repair a damaged photo. It uses a model trained on exactly that kind of damage. It's about three times slower and usually worth it.
Blur from camera shake or missed focus
Repair first has a Blur option that runs a deblur model before enlarging. It helps with mild shake and slightly missed focus. It won't rescue a photo where the subject is a smear, and on a sharp photo it actually removes detail, so only switch it on when the blur is real.
A frame grabbed from a video
Video frames carry their own kind of blockiness. Set Repair first to Video. It's also the right choice for files that have been saved over and over.
Grainy night photos
The green and magenta blotches your phone makes in the dark are color noise. Set Colour noise to Smooth and they even out, and since only the color is smoothed, the detail stays put. Only lift Brightness if the scene wasn't meant to be dark.
Soft faces in a small photo
Rebuild faces restores each face that looks toward the camera with a dedicated face model, then blends back only the detail. It's off by default. Faces that are turned away, too small, or that come back too different from the original are left alone, and the result tells you so.
If a face looks plastic, lower Strength or add Fine grain. Enlarge the face is a shortcut that finds the biggest face, crops around it and runs a 4x pass with faces switched on.
One warning that applies to every face tool out there, ours included: restoration can shift a likeness. Check the result with someone who knows the person.
How to restore old family photos
Old family photos and other personal pictures are the jobs people care about most, and usually the hardest. The print has faded, the only digital copy is small, and the faces matter more than anything else in the frame.
Scan or photograph the print properly
A flatbed scanner at 600 DPI is the best start, because it captures more than the print will ever need: a 6 by 4 inch print becomes 3600 by 2400 pixels. No scanner? Photograph the print flat, in soft daylight, with the phone held parallel to it and the flash off so there's no glare.
For phone shots, Find the print in Upscaler Lab spots a photographed print on a table and pulls it flat before you enlarge anything.
Restore the faded print, then enlarge it
Set Faded print to Restore, turn on Rebuild faces and press Enhance. Restore puts the black and white points back in each color channel, so a print that has gone gray and yellow gets its contrast and neutral tones back.
Afterwards, press Find scratches and dust. It highlights the damage it can spot, and Remove paints it out. Those areas are filled in, not recovered, and the saved file notes that it happened.
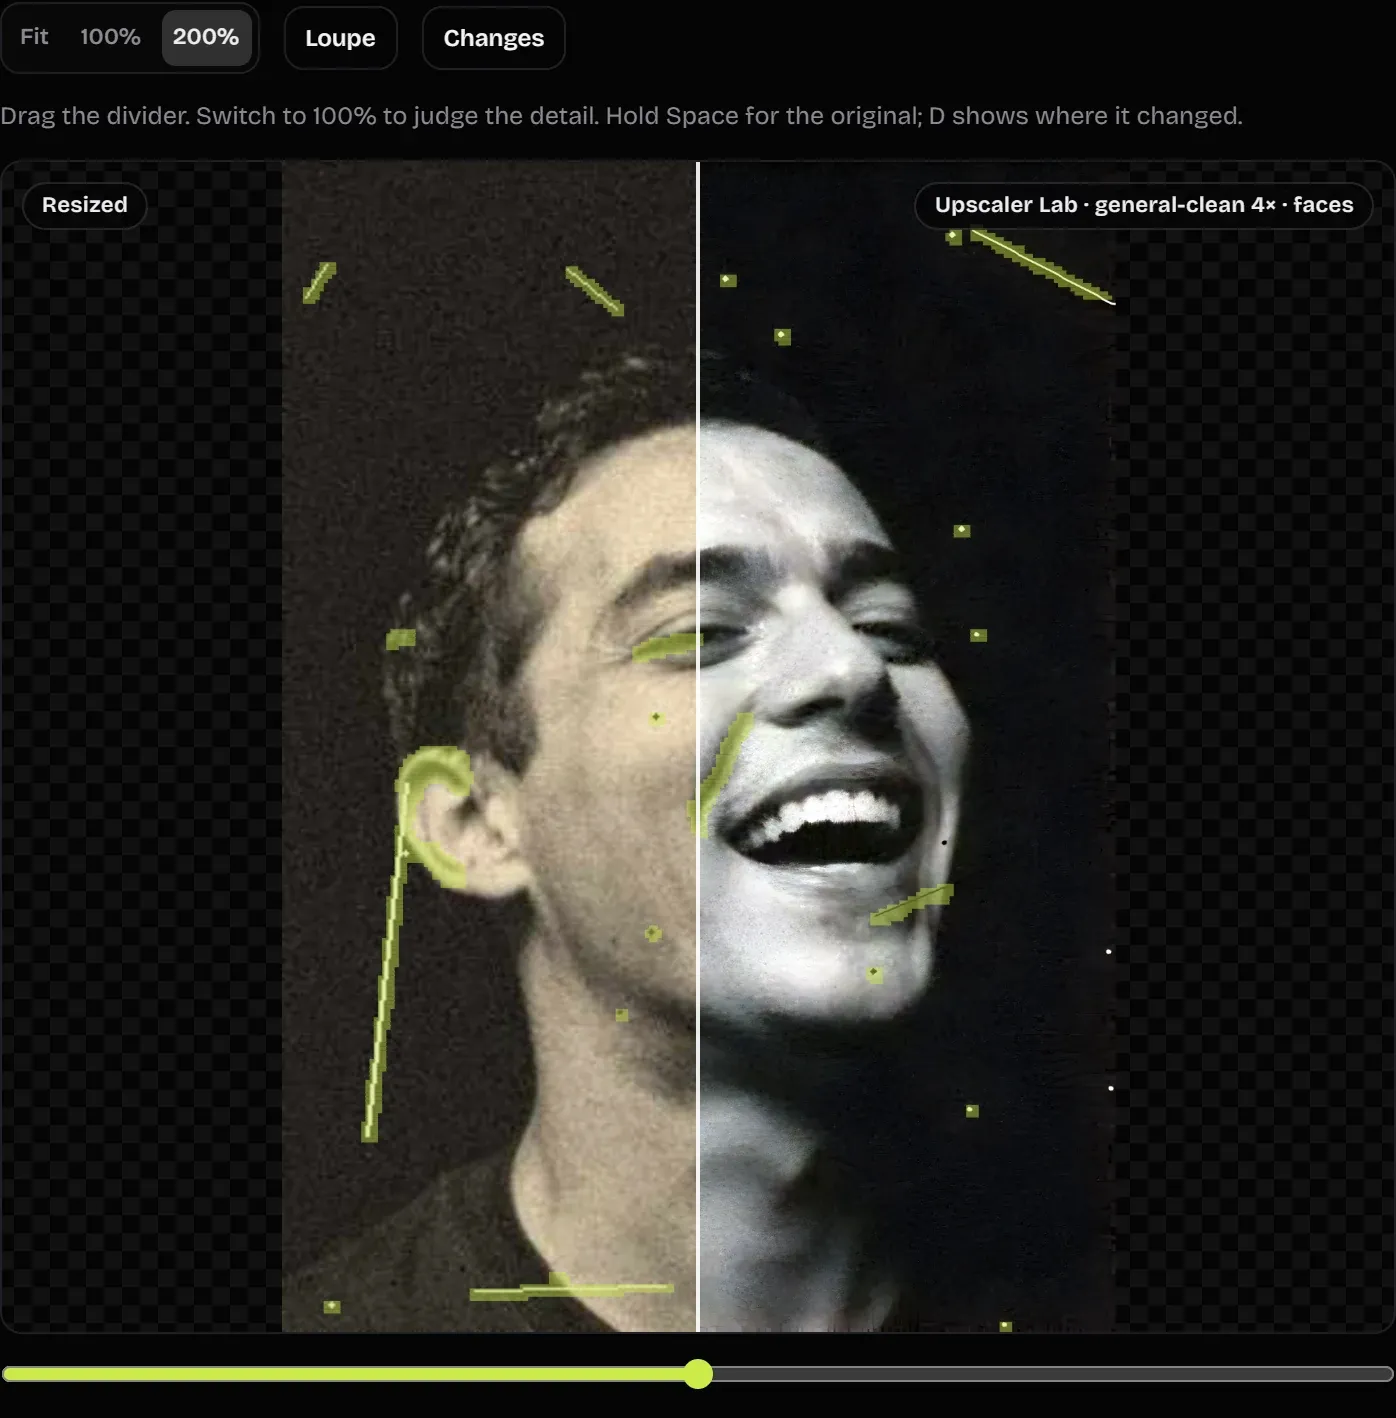
On a small, faded scan, the whole round trip brings the contrast back, sharpens the face and clears most of the dust. The long scratch beside the ear was only partly found, so that one is a job for the brush.
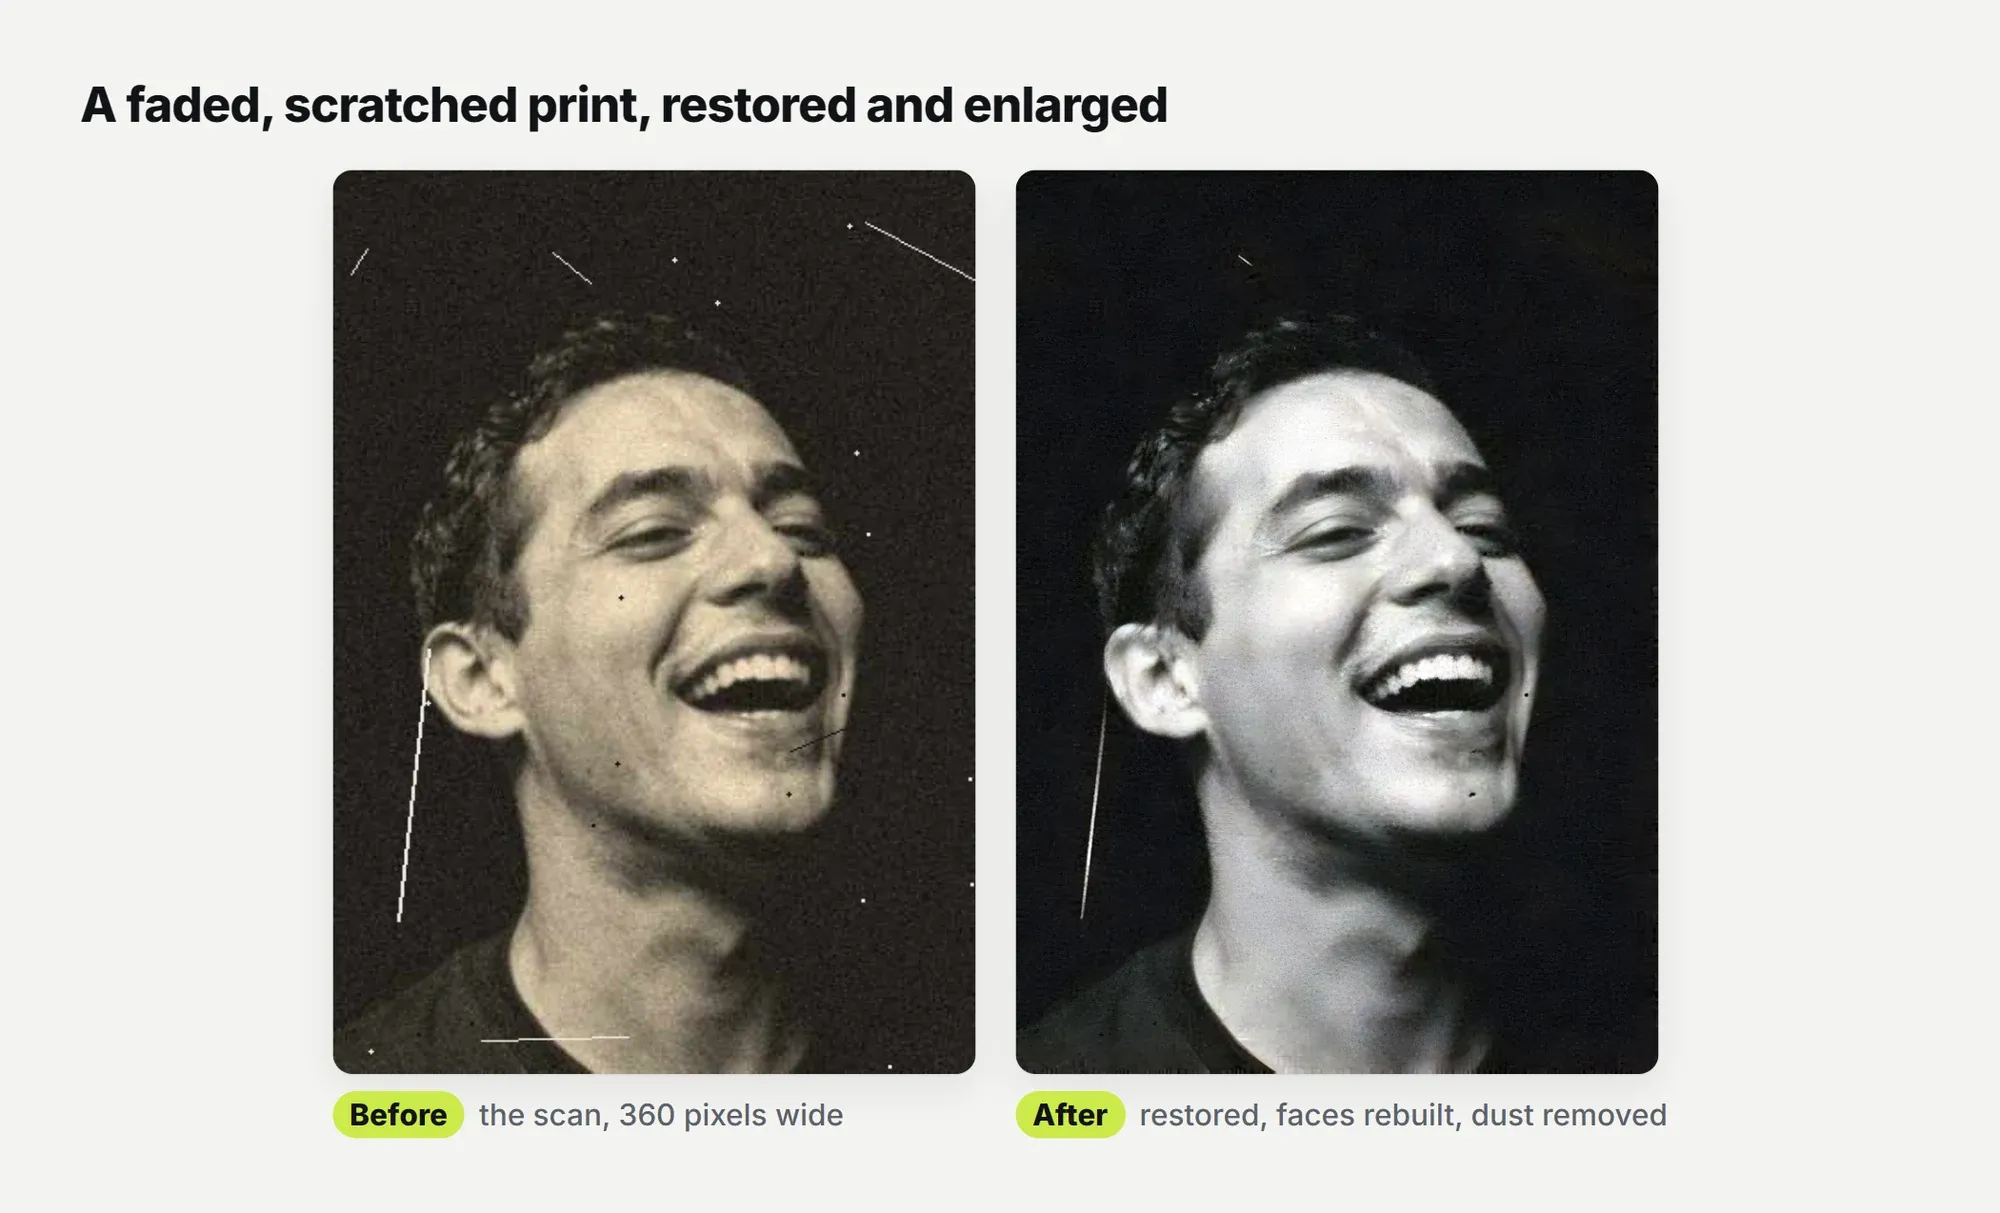
Miss the old sepia look after the cleanup? Warmth, in the Finish the result panel, brings it back on purpose.
Rescue personal photos that only survive as small copies
Plenty of personal photos only exist as a profile picture, a photo someone sent you in a chat, or a thumbnail from an old phone. Before you upscale one, look for a bigger copy: the cloud backup of the phone it was taken on, the person who took it, or the album it was first shared in. A full size original beats any upscale.
If the small copy is all there is, tick Repair a damaged photo, turn on Rebuild faces and stay between 2x and 4x. Check every face at 100% before you print or share it.
How to make a logo or illustration high resolution
Look for the vector first
If the image is a logo, an icon or a flat illustration, there's a good chance it started life as a vector file: SVG, AI, EPS or PDF. A vector has no pixels to run out of, so you can print it on a billboard and it stays sharp.
Before you upscale anything, ask whoever made it for the original. Here's the difference between vector and raster illustrations if you want the longer version.
Turn a flat logo into a vector
No original to be found? For logos and flat artwork, tracing the image into a vector usually beats enlarging it. Our Vectorizer Lab turns a PNG or JPG into a layered SVG you can scale to any size and recolor.
Our guide on how to convert a PNG to SVG covers it step by step.
If the source is tiny or rough, upscale it 2x to 4x first with the illustration setting, then trace the bigger version. The tracer has more to work with and the curves usually come out smoother.
Enlarge artwork with the illustration setting
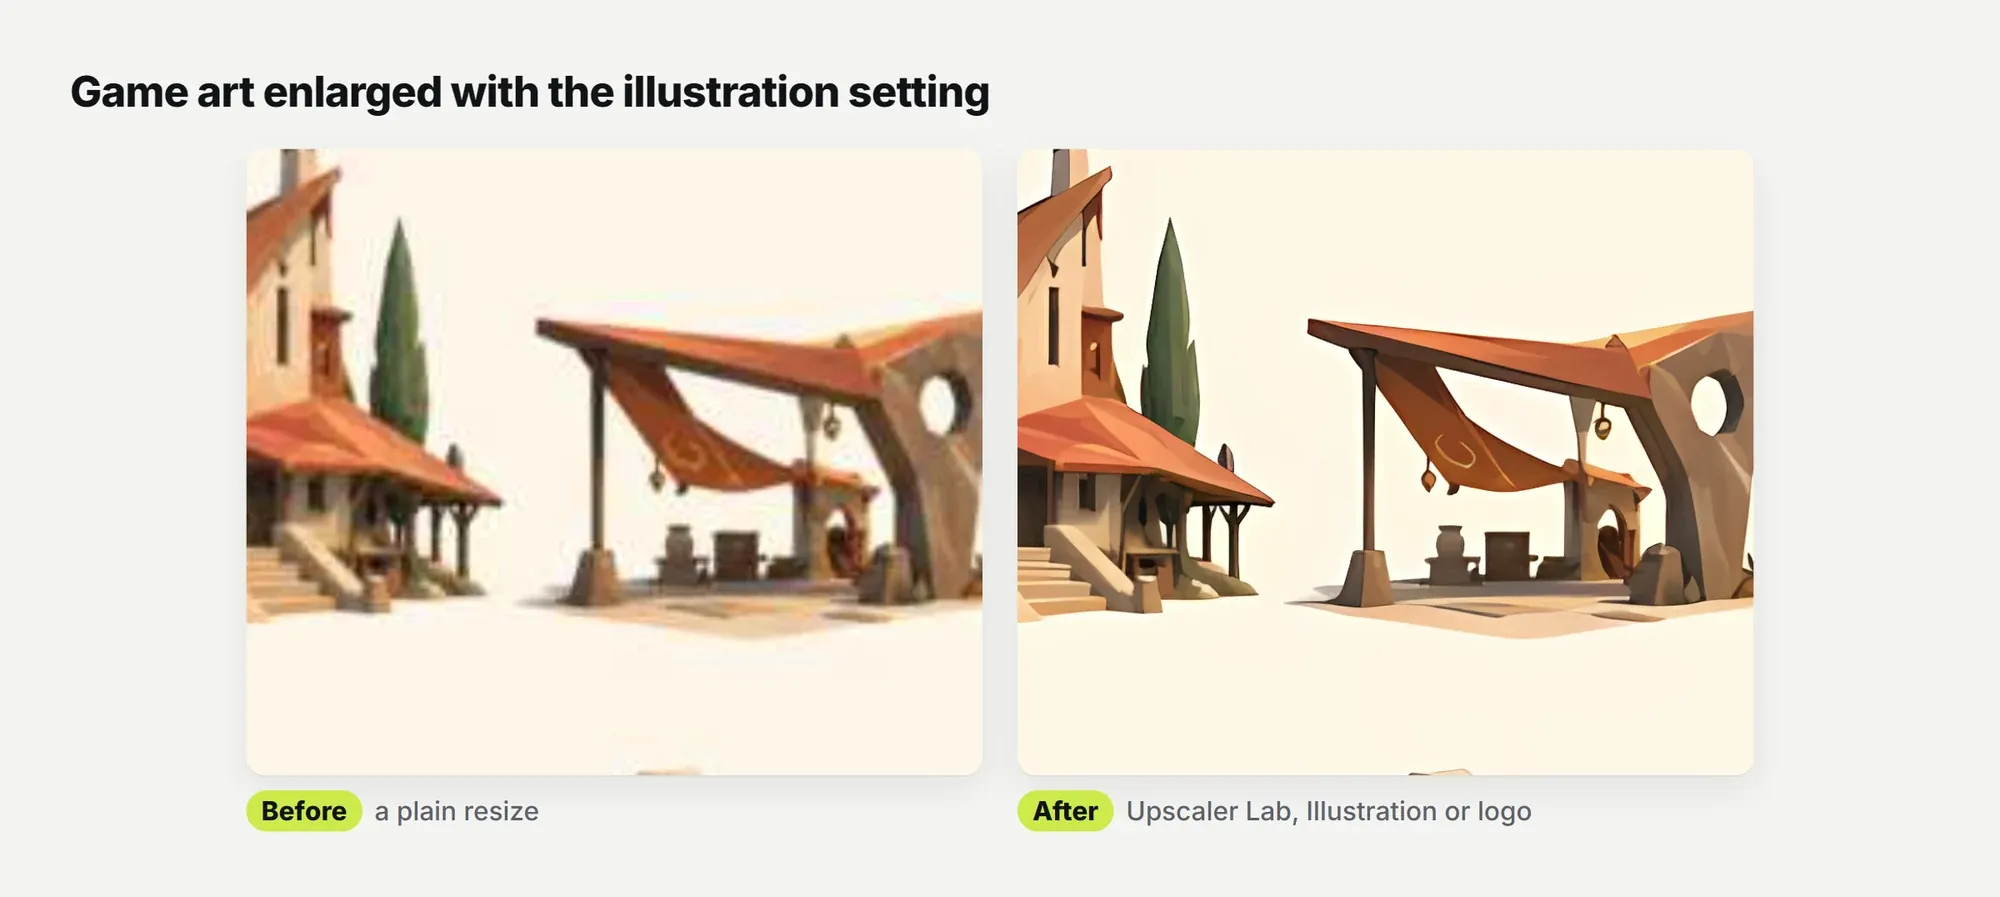
When a vector isn't an option, set What is this image? to Illustration or logo, or to Anime or comic. Both use a model trained on drawn art instead of photos, so flat color stays flat and line work stays clean. Use the Keep as shot brush over lettering the model shouldn't touch, and those areas come back as a plain resize.
Keep pixel art as pixels
Pixel art is the one case where smooth is wrong. Choose Pixel art and the grid comes back as exact square blocks. If you want to make pixel art from a photo in the first place, Pixel Lab does that, and here's our guide on how to make pixel art from a photo.
This is also why every illustration in our illustration packs comes as an SVG as well as a PNG, and there are free SVG illustrations to start with. You never need to upscale one. Export the size you need, or drop the SVG straight into Figma or your site and it's sharp at any size.
Can upscaling add detail that isn't there?
No. Most before and after shots online skip this part.
- It can't recover detail the file never captured. A license plate that's six pixels tall stays unreadable, whatever the before and after shots online suggest.
- Past 4x, most of what the model adds is invented.
- Tiny faces stay tiny. If the eyes are less than about 16 pixels apart in the original, the tool skips the face rather than invent one.
- Heavy blur stays heavy. A deblur pass helps with a little shake, not a smear.
- A file that was already enlarged once gets worse, not better, if you push it again. That's why our tool suggests only 2x for those.
Hit one of these walls and the fix isn't a better upscaler. It's a bigger original, a reshoot, or for artwork, a redraw.
What's the best way to upscale an image?
The app matters less than three habits: start from the biggest original, use a model for anything between 2x and 4x, and check the result at 100% before it goes anywhere. With those in place, here's how the main options compare.
| Option | Examples | Cost | Where it runs | Good for |
|---|---|---|---|---|
| Image editors that resample | Photoshop, GIMP, Preview on a Mac | Photoshop is paid, GIMP and Preview are free | Your computer | Small enlargements, and pixel art with nearest neighbor |
| Super Resolution in Adobe apps | Lightroom, Camera Raw | Creative Cloud subscription | Your computer | Doubling the width and height of camera photos |
| Desktop upscaler apps | Upscayl, Topaz Gigapixel | Upscayl is free, Gigapixel is paid | Your computer, with a capable graphics card | Big batches on a strong machine |
| Online services | Let's Enhance, Bigjpg, imglarger | Free tiers with limits, then credits | Their servers | A quick single image |
| A browser tool | Upscaler Lab | Free, no account, no watermark | Your browser, on your graphics card when WebGPU is available | Photos, old prints, illustrations and batches |
For one photo you're about to print, any of these will do if you follow the steps above. For old family photos, small web images and illustrations, and especially for a whole folder at once, that's the job we built Upscaler Lab for.
Frequently asked questions
Can you turn a low resolution image into a high resolution one?
In pixel count, yes. An upscaling model predicts edges and texture, but it can't bring back detail the file never recorded. Up to 4x usually holds up at reading distance, and above 4x most of what's added is invented.
Does setting an image to 300 DPI make it high resolution?
No. DPI only tells a printer how densely to place the pixels, so an image 1200 pixels wide prints 4 inches wide at 300 DPI whatever number the file carries. Only adding pixels raises the resolution.
How many pixels do I need to print an 8x10 photo?
2400 by 3000 pixels at 300 DPI, which is 7.2 megapixels. For a poster seen from across a room, 150 DPI is usually enough, so 1200 by 1500 pixels.
Is upscaling better than resizing?
From about 2x up, an upscaling model usually keeps edges sharper than a bicubic resize. Pixel art is the exception: use nearest neighbor or exact blocks so the pixels stay square. Either way, compare both at 100% before you decide.
Can a blurry photo be fixed?
Mild camera shake or slightly missed focus can be reduced with a deblur pass before enlarging. In Upscaler Lab that's Repair first, set to Blur. Heavy blur can't be undone, and a deblur pass on a sharp photo only removes detail.
How do you upscale a low quality photo?
Fix the damage first, then enlarge. Clean up compression blocks and noise, repair blur only if it's real and rebuild soft faces, then upscale 2x to 4x. Check the result at 100% against a plain resize before you use it.
Can you restore old photos for free?
Yes. Scan or photograph the print, then in Upscaler Lab set Faded print to Restore, turn on Rebuild faces, enlarge it and use Find scratches and dust to paint out the marks. It's free, with no account and no watermark.
Is Upscaler Lab free, and what happens to my photo?
It's free, with no account and no watermark. The enlarging runs in your browser tab on your own graphics card, not on a server. GetIllustrations keeps a copy of each file you add so the tool can be monitored for abuse, and your results aren't copied.
Upscale your image for free
Got that photo from the start of this guide, the one that's only 900 pixels wide? Drop it into Upscaler Lab, let it read the file, pick 4x and check the faces at 100% before you send anything to print.
And if what you're really after is artwork that never needs enlarging, browse the illustration packs. Every one comes as SVG and PNG, ready for print and screen at any size.